The way you organize the Configuring tool workspaces into development hierarchies affects how software changes move through your development groups and how you manage software releases.
This topic discusses workspace hierarchy strategies that have been developed at a large software development site that uses Configuring.
This discussion is intended to present you with ideas and concepts that you can adapt to your own unique development environment. Perhaps the most significant underlying concept presented in this discussion is that Configuring workspace hierarchies are flexible. Configuring enables you easily reconfigure hierarchies as your project, organization, and experience with Configuring evolve.
Scenario
A company that produces software to control assembly line processes recently purchased Configuring to help it manage its large software development process. This company markets two products -- one controls large, heavy industrial processes and another controls electronics assembly lines. The industrial product employs approximately 100 developers and the electronics product employs about 75 developers.
After analyzing their development and release processes, company management recognized that their primary goals for using Configuring were to:
The company realized that a key to accomplishing these goals was to effectively organize its workspace hierarchies.
Implementation
The following sections describe the workspace hierarchy strategies developed by company management that enabled them to meet their goals.
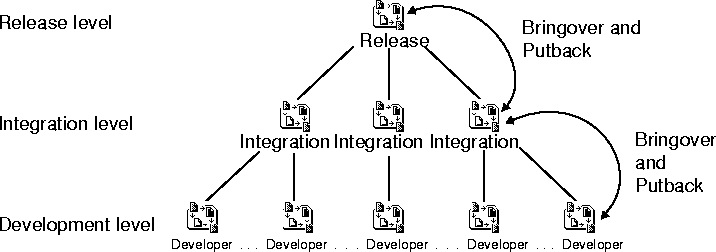
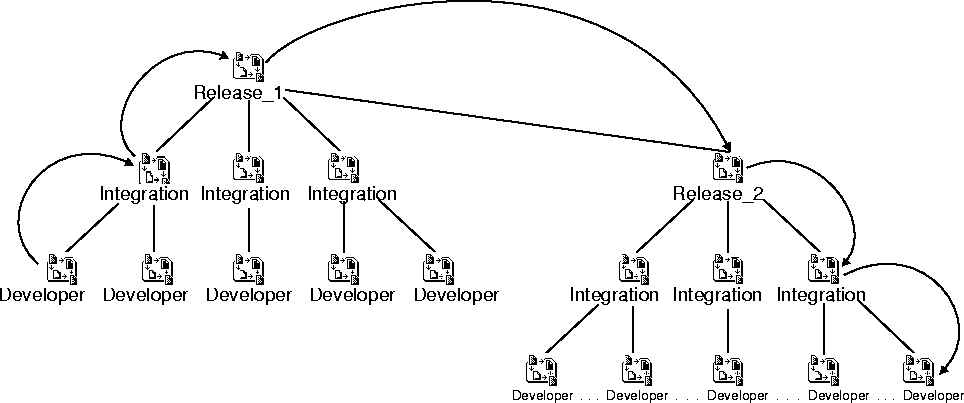
Workspace Hierarchy Levels
The company decided that to best organize both development groups (the Industrial Group and the Electronics Group), the development workspace hierarchies must be at least three levels deep. These levels are:
Note - Your workspace hierarchies may require fewer levels or more levels than this company decided was optimal for it. If your project consists of a very large number of developers, you can add a second sub-integration level in order to reduce the number of developers that put back work to each integration workspace. If, on the other hand your project is not large, you can omit the integration level entirely and have developers put back work directly to the release workspace. The principles described in this section apply in either case.
Click for closeup.

Figure 1 Workspace Hierarchy Levels
Development Level
This is the level in which the code development work is done. Generally, each developer has her own workspace. Note that a developer who works on more than one distinct task might have more than one workspace.
In a typical development cycle, the developer:
Development workspaces generally contain only the files required for the developer to build and test her work.
Integration Level
Integration workspaces are used to combine the work of a number of developers. Generally, integration workspaces are allocated based on functionality, for example the group responsible for a large library and the group responsible for product's I/O drivers are assigned their own integration workspaces. Developers working in these functional areas share their changes by putting their changes back to their integration workspace and by bringing over changes made by other developers from these workspaces.
Integration workspaces generally contain only the files required to build and test a given portion of the product.
Release Level
The release level is comprised of a single workspace at the top of the hierarchy. After work done by developers in functional groups is integrated in the integration workspaces, it is put back to this workspace for final product release integration, testing, and dissemination to the other integration workspaces. Each release is generated from child workspaces of the release workspace that are created specially for this purpose.
Release workspaces contain all the files that comprise the product.
Optimizing Integration
Company management decided that one of the most crucial steps in the development process is the integration of developers' work in both the integration workspaces and in the release workspace. The strategies discussed in this section maintain the consistency and availability of integration workspaces.
If integrators work directly in integration workspaces, the workspaces must be locked against putback and bringover transactions from developers in order to ensure consistency. Locking integration workspaces interrupts the development process by preventing developers from exchanging code.
Likewise, when the work from integration workspaces is integrated into a release workspace, the release workspace also goes through a period of instability. During the time it takes to incorporate changes, work cannot be putback to, or brought down from the release workspace.
The development groups arrived at two strategies to address these issues. The two strategies are very similar, but they differ slightly in the way integration is managed. Both strategies mitigate the disruption caused by the integration process.
The first strategy was adopted by the Electronics Group. Their product is highly interdependent -- the entire product must be integrated as a whole. The second strategy was adopted by the Industrial Group. Their product is more modular -- the different functional areas can be integrated separately.
Strategy 1
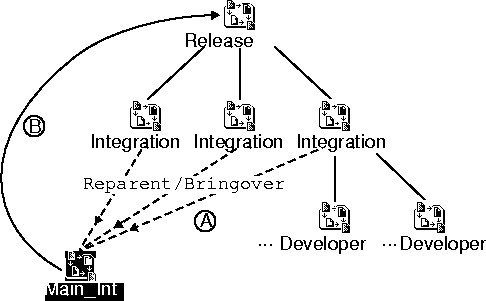
Because the Electronics Group's product is highly interdependent and must be integrated as a whole, this strategy utilizes a main integration workspace in which the entire electronics product is integrated.
Integration does not actually take place in the individual integration workspaces. Instead the code is brought over from the individual integration workspaces to the main integration workspace where the work is integrated, tested, and then put back to the release workspace. Figure 2 illustrates this process.
Click for closeup.

Figure 2 Using a Main Integration Workspace (Strategy 1)
The following steps outline how changes are integrated and moved into the Release workspace.
- 1. A Main Integration workspace is created.
- 2. At specified development milestones, the Main Integration workspace is reparented (in turn) to each Integration workspace and all changes are brought over into it (A).
- 3. The changes are integrated, tested, and stabilized entirely in the Main Integration workspace.
- 4. After the integration is complete and stable, the contents are put back to the Release workspace where it becomes available to the Integration workspaces, and ultimately to the developers (B).1
This strategy accomplishes the following goals:
- By using the bringover transaction to transfer changes from the integration workspaces into the Main Integration workspace, all conflicts are isolated in the Main Integration workspace. If the putback transaction is used to transfer changes directly from integration workspaces to the Release workspace, conflicts are resolved directly in the integration workspaces.
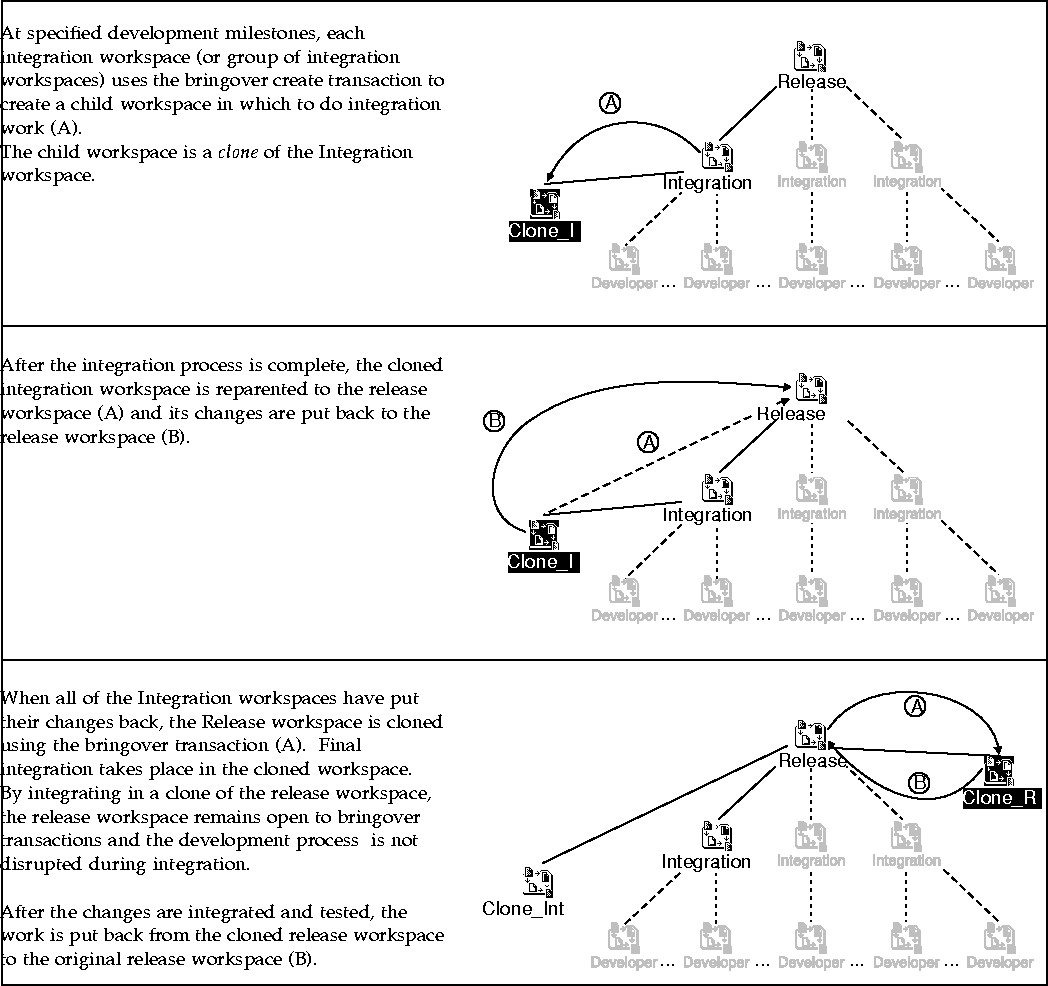
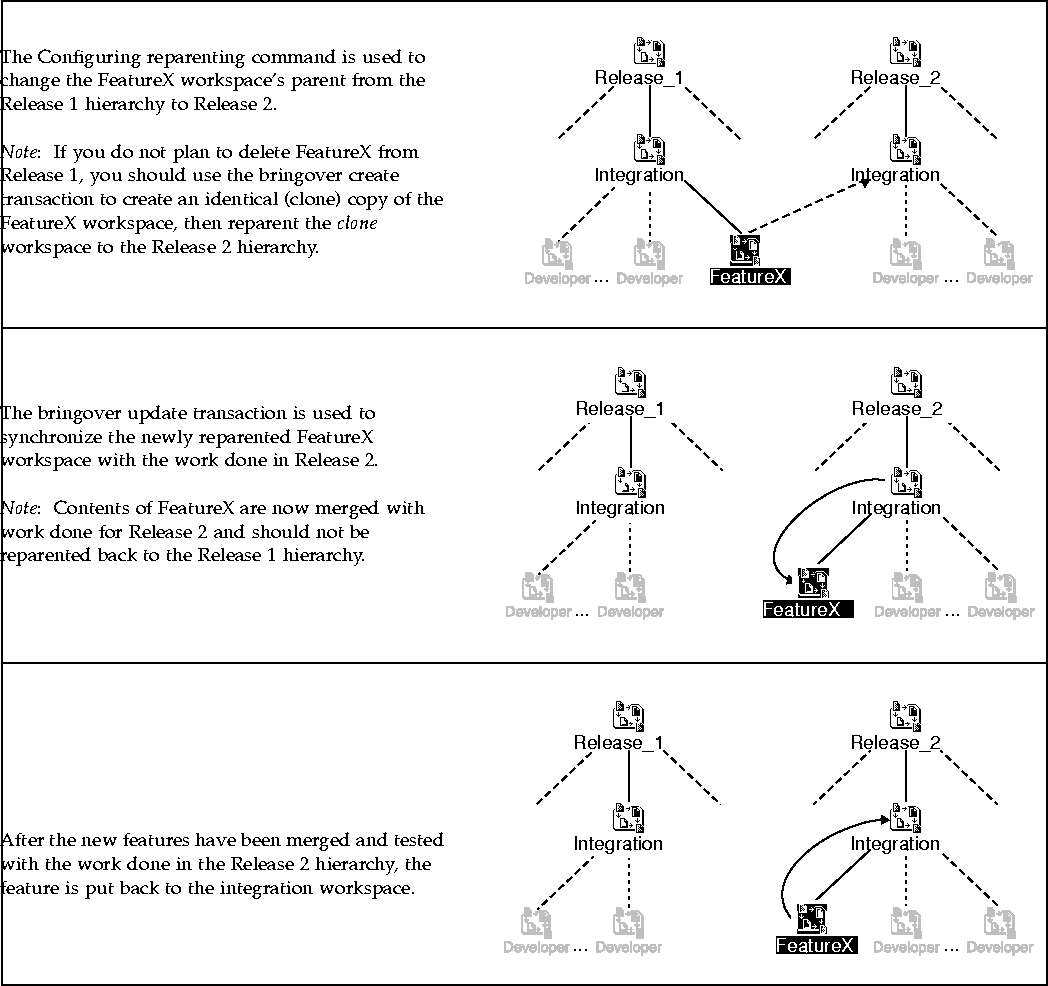
Strategy 2
The Industrial Group employed a variation of Strategy 1. Their source base is organized so that sub-components of the product (contained in integration workspaces) can be integrated separately or in groups. An advantage of this strategy is that changes made by developers can be disseminated throughout the hierarchy as they become ready, rather than waiting for the entire project to be ready as is the case in Strategy 1. Final product integration is postponed until all changes are present in the release workspace.
Figure 3 describes Strategy 2.
Click for closeup.

Figure 3 Using Integration Workspace Clones (Strategy 2)
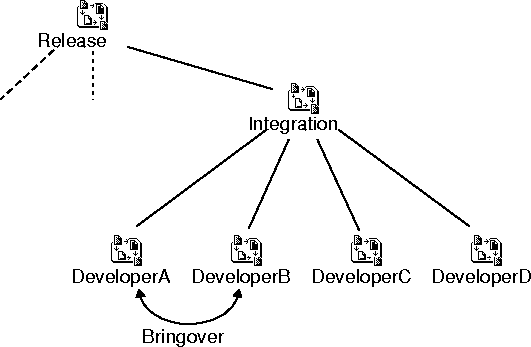
Peer-to-Peer Updates
After the company began using Configuring, some developers discovered that it was sometimes helpful to reparent and use the bringover transaction to directly update each other's workspaces. This is shown in Figure 4.
Click for closeup.

Figure 4 Peer-to-Peer Updates Using the Bringover Transaction
This peer-to-peer update technique was found to be useful when two or three developers are working closely on a specific part of a project. They are typically part of an integration group that contains other developers who are working in other areas. It is sometimes efficient and convenient for closely coupled developers to share their work directly with each other and not through the normal workspace hierarchy.
Development groups have found this strategy to have these advantages:
They have also found that the strategy can have these disadvantages:
These co-developers use the bringover transaction to exchange work directly between their workspaces. This is best accomplished by reparenting "on-the-fly" as part of the bringover transaction (specify an alternate parent in the Transactions Window or use the -p option on the command-line).
Note - Generally, the putback transaction is not used in this manner because it is best that a developer not change the contents of another developer's workspace.
Concurrent Development
The company often finds itself in the position of developing multiple product releases concurrently. For example, development of Release 2 of the industrial product began well before development of Release 1 was complete.
The company employs a couple of strategies to assist it with concurrent development. The major goals of these strategies are to:
The Cascade Model was found most effective when the source bases for Release 1 and Release 2 are closely related. The Reparenting Model was developed for cases when the Release 1 and Release 2 sources bases differ significantly and also for moving discrete features between releases.
Cascade Model
The company noticed that in most circumstances Release 2 is a superset of Release 1 -- Release 2 contains all of the features of Release 1, plus bugfixes and new features. When this relationship exists, a cascading hierarchy of development hierarchies was found to be very effective. In the Cascade Model the new Release workspace is a child of the previous release's Release workspace.
Linking development hierarchies in this manner was found to have a couple of advantages:
Figure 5 shows the relationship between Release 1 and Release 2 in the Cascade Model.
Click for closeup.

Figure 5 Updating Release 2 from Release 1 (Cascade Model)
Note that changes are always brought down from the older release to the newer release. In this case, as new work is integrated in Release 1 it is brought over to Release 2.
Note - Since you have to integrate the features from Release 1 into Release 2, you probably want to consider bringing the work over into a clone (child) of the Release_2 workspace for integration rather than directly into Release_2. Refer to "Optimizing Integration" on page 40 for details.
Using a clone workspace provides two advantages:
 The Release_2 workspace remains open for bringovers during integration.
Unwanted changes made during the integration can be backed out by
reverting to the contents of Release_2.
This cascade model can be extended to include a cascade of multiple consecutive release hierarchies.
Click for closeup.

Figure 6 A Three-Release Cascade
Reparenting Model
The development groups found that in some situations it is not practical to transfer changes between hierarchies through its release workspaces. In these cases they decided that it is better to propagate discrete features directly from the development level of a release hierarchy to the development or integration level of another. Consider the following cases:
Note - Whenever you transfer work between workspaces it is extremely important that you guard against inadvertently contaminating the reparented workspace with changes that you do not intend to transfer. One way to help prevent this type of contamination is to carefully select and limit the files that you transfer.
Figure 7 shows the steps involved in moving a feature between development hierarchies.
Click for closeup.

Figure 7 Late Binding of a Feature to a Release
Unanticipated Releases
In addition to regularly scheduled releases, the company finds itself generating releases that were not initially planned. These unanticipated releases generally fall into two categories:
The company developed the following strategies to accommodate these releases. Both are variations on the cascade and reparenting models discussed in the previous sections.
Minor Releases
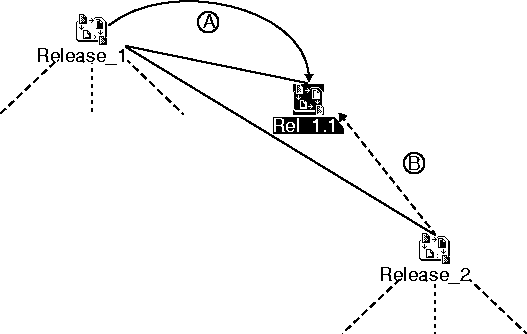
A minor release is one that contains the entire product, much like a regularly scheduled release. The company denotes these types of releases with numbering schemes such as "1.1" or "1.0.1." They have found that it works well to insert these releases into the product release cascade.2
The following steps insert a minor release into the release cascade.
Click for closeup.

Figure 8 Inserting a Minor Release Into the Release Cascade
- 1. A child of the Release 1 release workspace is created using the bringover create transaction (A).
- A new development hierarchy is set up under the Release_1.1 workspace in which to develop Release 1.1.
- 2. The Configuring reparenting command is used to reparent Release_2 to Release_1.1 (B).
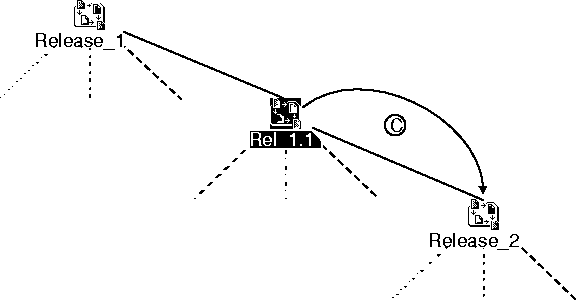
- 3. The Release 2 workspace is periodically updated with changes made for Release 1.1 (C).
Click for closeup.

Figure 9 Updating Release 2 From Release 1.1
By inserting these minor releases into the cascade:
Patch Releases
A patch release is one in which only a small portion of the product is released in order to correct a defect in the product. The company has found that this type of change usually best propagated to other releases using the reparenting model.3
For example, a serious bug is found in Release 1 of the company's industrial product and the company decides to produce a patch that can be distributed to customers who encounter the problem.
Figure 10 shows a patch release workspace inserted into a release cascade.
Click for closeup.

Figure 10 Creating a Patch Release
The following steps create a Release 1 patch release workspace and incorporate the patch into the Release 2 development hierarchy:
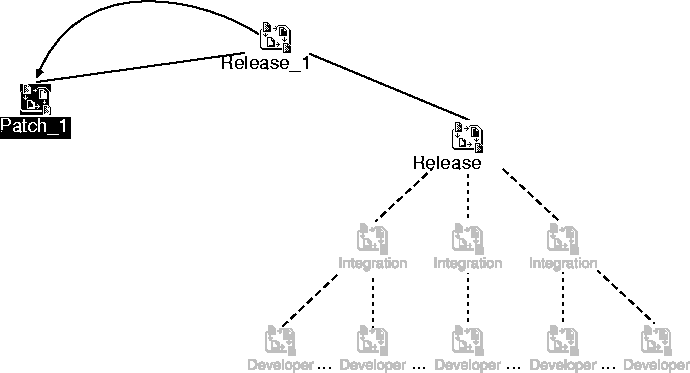
- 1. The bringover create transaction is used to create a child workspace (Patch_1) of Release_1 (Figure 10).
- 2. A development hierarchy is created with Patch_1 as the top-level release workspace.
- The size and depth of this hierarchy depends on the number of developers assigned to work on the patch release. Generally, patch development hierarchies are relatively small.
Click for closeup.

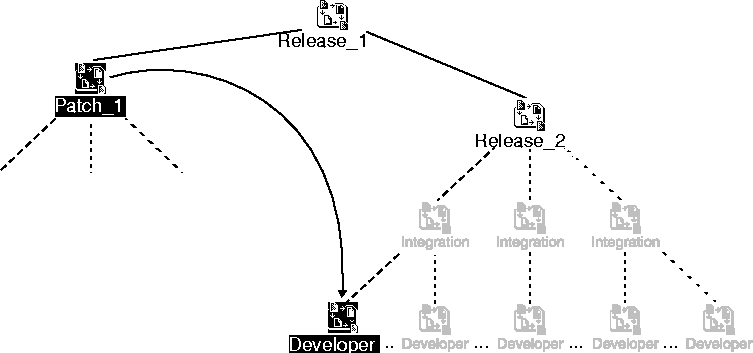
Figure 11 Reparenting the Patch Workspace
- 3. After the patch is developed, tested, and released, a developer from the Release 2 development hierarchy uses the bringover transaction to integrate the patch into his workspace in the Release 2 hierarchy.
- This is best accomplished by reparenting "on-the-fly" as part of the bringover transaction (specify an alternate parent in the Transactions Window or use the
-p option on the command-line).
Some Notes About Patch Releases
1
Instead of using the putback transaction to move the contents of the Main Integration workspace to the Release workspace, you could simply replace the Release workspace with the Main Integration workspace. An advantage of using the putback transaction is that you insure that nothing has been inadvertently changed in the Release workspace since the last update.
2
Release cascades are described in "Cascade Model" on page 46.
3
This model is described in "Reparenting Model" on page 47.