Sun WorkShop TeamWare: User's Guide: 12 - Configuring Example


This chapter illustrates the basic bringover, putback, resolve cycle using an example.
This example employs a simple case to demonstrate:
For this example, assume two writers (Jane and Bob) are responsible for maintaining the man pages for some of the Configuring commands. The main man page workspace is named man_pages. The writers decide that they will each do their work in separate child workspaces and merge their work in man_pages. Figure 12-1 shows the file system hierarchy in the workspace man_pages.
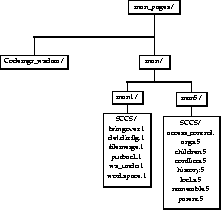
Figure 12-1 The man_pages Workspace
Creating Workspaces
Each writer creates his and her own child workspaces. Each child contains the same files as the parent workspace man_pages.
- 1. Jane selects the man_pages icon on the Workspace Graph pane and chooses the Bringover
 Create item from the Transactions menu.
Note - For accelerator options see "Accelerators" on page 60."
- 2. The Bringover Create Transactions window is activated. Jane enters the following information:
- The Transactions window as it is configured to create Jane's child workspace man_pages_jane. (Bob repeats the process to create his workspace named man_pages_bob.)
Note - The character "." (representing all of the workspace) could have been specified in the file list pane instead of man/. Since all SCCS files are located beneath man/, the two are equivalent.
Notes Regarding the transaction output:
- The name table is a file that assists the Configuring program in tracking file names, it is used to speed up the processing of renamed files.
- During the initial examination phase of the Bringover transaction, the Configuring program determined that 15 files differed in the parent and child. In this case, since the child is being created and thus contains no files, all files contained in the parent are considered for the transaction.
- The Configuring program has determined that 15 files should be brought over from the parent to the child workspace.
- Summarizes the results of the transaction.
- This line indicates that 15 files were created (as opposed to updated) in the child. In the Bringover Create transaction, all transferred files fall into this category.
Putting Back Changes
Bob begins work in his new workspace and makes changes to three files: bringover.1, putback.1, and args.5. He decides that these changes are important and that Jane should have access to them. He uses the Putback transaction to copy the changes back to the common parent workspace man_pages.
- 1. Bob selects the man_pages_bob icon on the Workspace Graph pane and chooses the Putback item from the Transactions menu.
Note - For accelerator options see "Accelerators" on page 60."
- 2. When the Putback window is activated, Bob chooses the Preview option. By choosing this option, the transaction proceeds without actually copying files. Bob is able to view the output of the transaction without actually altering files; by using this option he is able to confirm that the transaction will proceed the way he expects.
- Note that the Configuring program automatically loads the directory /man into the File List pane. This is the directory that Bob specified when he created man_pages_bob; the value was saved in the workspace Codemgr_wsdata/args file. He could change the contents of the File List pane using the items in the File and Edit menus directly below the pane.
Updating a Workspace
Jane makes changes to the files putback.1 and locks.5 in man_pages_jane. Before she attempts to put the changes back to the man_pages workspace, she wants to update her workspace with the changes that Bob has just put back to man_pages. She uses the Bringover Update transaction.
- 1. Jane selects the man_pages_jane icon on the Workspace Graph pane and chooses the Bringover Update item from the Transactions menu. For accelerator options see "Accelerators" on page 60."
- 2. When the Bringover Update window is activated, Jane chooses the Preview option. By choosing this option, the transaction proceeds without actually copying files. Jane is able to view the output of the transaction without actually altering files. By using this option she is able to determine which files have been changed prior to taking any real action.
- The output indicates that:
- 3. None of these changes surprises Jane, so she decides to complete the transaction by reexecuting it with the Preview option deselected. After the transaction completes as expected, the Configuring program automatically presents Jane with the option to resolve the conflict created on putback.1.
Resolving Conflicts
Jane decides that she wants to resolve the conflict now and she clicks SELECT on the Resolve now button. The Resolve transaction window is activated.
Note - If the conflict is left unresolved, the Resolve transaction can be initiated later by either double-clicking SELECT on the man_pages_jane icon, or by selecting the icon and choosing the Resolve item from the Transactions menu.
Note - If the "auto load" property is set for the Resolve window, the Merging program begins execution automatically
The file in conflict (man/man1/putback.1) is listed in the Resolve window File List pane. The file is automatically selected (surrounded by a box) so Jane clicks SELECT on the Merging button. If there had been multiple files in the list, Jane could have deselected any portion of the list. If the Auto Advance property is selected (the default), the Configuring program automatically works its way down through the list of selected files.
The Configuring program starts the Merging program and passes it the name of putback.1
Jane works her way through the merging process, accepting Bob's changes from the right pane and her changes from the left. When all the differences have been resolved, she saves the changes. See Chapter 9, "Resolving Conflicts," for more information about using Merging.
Jane can now put back her changes to the parent workspace (man_pages) following the same procedure that Bob used ("Putting Back Changes").
