WorkShop Visual Replay |
13 |
 |
In record mode, WorkShop Visual Replay creates a script containing a high level description of the user's actions e.g. "push hello_button, type Hello World".
In playback mode, you can check the state of any widget in the application and control the rate of playback. The actions in the script are replayed exactly as if the user were sitting at the keyboard.
WorkShop Visual Replay has a user extensible command set which is powerful, easy-to-use and very flexible. It can be deployed in many ways:
WorkShop Visual Replay is available from the WorkShop Visual "Tools" menu. You can also use the tool from the command line as described in the Recording and Replaying from the Command Line section on page 439.
This chapter starts by providing you with a description of the use of WorkShop Visual Replay together with some simple tutorial examples to help you become acquainted with its use. The Extending the WorkShop Visual Replay Widget Set section on page 451 and the Adding your own WorkShop Visual Replay commands section on page 465 describe how to extend the capabilities of WorkShop Visual Replay.
Appendix C, "WorkShop Visual Replay Command Syntax provides detailed descriptions of the syntax of WorkShop Visual Replay scripts.
13.1.1 Before Using WorkShop Visual Replay
For successful operation of WorkShop Visual Replay, the Motif application you wish to record must have been dynamically linked with the Xt library (libXt). On many UNIX implementations, you can find out whether the application has been dynamically or statically linked with libXt by typing:ldd AnApplication
If the output mentions libXt, the application has been dynamically linked with the Xt library and can be used with WorkShop Visual Replay. If this library is not present, the application has probably been statically linked with the Xt library. You will have to relink your application with the Xt shared library if you want to use WorkShop Visual Replay.
13.2 How to Invoke an Application with WorkShop Visual Replay
When you select "WorkShop Visual Replay" from the "Tools" menu, a dialog is displayed requesting the name of the application you wish to record or replay. This dialog is shown in Figure 13-1.
Note - If you are keen to get started straight away with WorkShop Visual Replay, you may wish to skip this section and move directly to the Tutorial section on page 435.
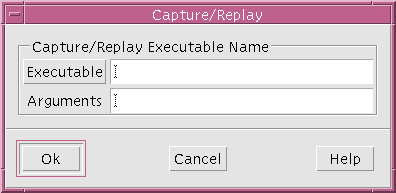
Figure 13-1 Capture/Replay Application Prompt
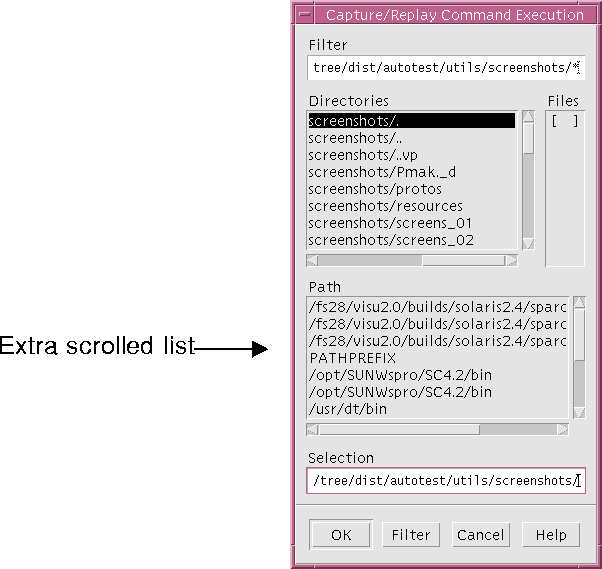
Figure 13-2 Capture/Replay File Selection Box
When you select an entry from the "Files" list and "OK" the dialog, the entry is placed in the "Executable" field of the Capture/Replay Application Prompt dialog. Enter any flags or arguments for the application in the text box labelled "Arguments" in this dialog. When you press "OK", the application is run with WorkShop Visual Replay.
Note - The extra scrolled list uses the PATH set up for you when you ran WorkShop Visual and may contain some extra directories required by WorkShop Visual. When you exit WorkShop Visual your PATH is the same as it was before running the application.
WorkShop Visual Replay focuses on recording navigation between widgets within an application and the user interaction with those widgets. The following information can be recorded and replayed:
13.2.2 The WorkShop Visual Replay Interface
The WorkShop Visual Replay dialog appears to the side of your application. A copyright message is also shown on standard error when WorkShop Visual Replay starts up.
The WorkShop Visual Replay dialog is shown in Figure 13-3.
Figure 13-3 WorkShop Visual Replay dialog
This dialog has two pages - one for WorkShop Visual Replay (Replay) and one for WorkShop Visual Capture (Capture). You can change between pages by selecting from the option menu labelled "Page". For details on the dialog when you are using WorkShop Visual Capture see the WorkShop Visual Capture section on page 416.
13.2.3 Functions and Operations
Once the WorkShop Visual Replay dialog is displayed, you can begin to record/replay scripts straight away. All record/replay actions take place using the WorkShop Visual Replay button panel which is shown in Figure 13-4.
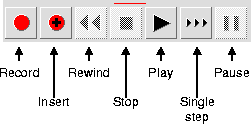
Figure 13-4 WorkShop Visual Replay button panel
Only valid buttons can be selected; all other buttons are grayed out.
Creating and Naming Scripts
Press the "New Script" button to create an empty script. To name or rename a script, do the following:
Note - If you have no scripts in the WorkShop Visual Replay dialog, pressing "Record" will create a new "unnamed" script automatically.
The WorkShop Visual Replay status indicator shows you whether you are recording or replaying and where in the script you are. If the status indicator is red, it indicates that you are recording. Otherwise you are replaying. Figure 13-5 shows the possible states of the indicator:

Figure 13-5 WorkShop Visual Replay Indicator States
Monitoring
The "Monitor" button displays a log of the actions you are taking while recording and replaying. Comments indicating the start and end of a record or replay session are inserted automatically by WorkShop Visual Replay as demonstrated in Figure 13-6.
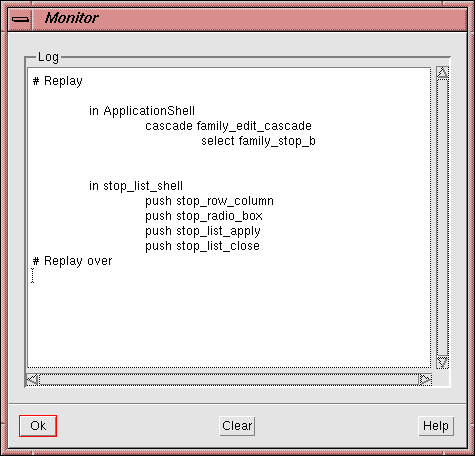
Figure 13-6 WorkShop Visual Replay Monitor Window
IInserting Extra Commands
As well as actions, you can also add non-application commands and comments to a script. This can be done by editing the script by hand or via the WorkShop Visual Replay interface. This section describes how to edit the script from the interface.
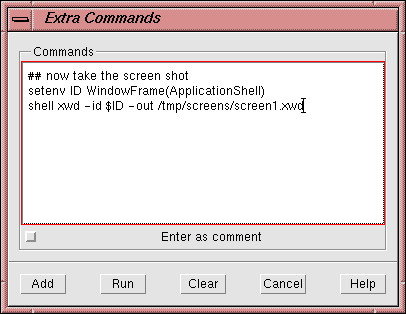
Figure 13-7 Extra Commands dialog
Changing Replay Speed
The fast/slow slider on the WorkShop Visual Replay dialog allows you to change the speed at which the selected script is replayed. By default, the script is played at the maximum speed. 13.2.4 Application Modal Dialogs
If your application runs an Application Modal dialog, you will not have access to the WorkShop Visual Replay interface until you have closed the dialog. This means that you cannot stop recording or replaying within the dialog. In single-step mode, all actions within an Application Modal dialog are treated as a single step. 13.2.5 Saving and Accessing Scripts
By default, the scripts you create in the WorkShop Visual Replay dialog are stored in a temporary unnamed directory.
Use the "Save As" option from the WorkShop Visual Replay Directory menu to save the current directory under a new name.
Warning - Unless the environment variable XDS_KEEPDIR is defined, the temporary directory (and its contents) is removed automatically when you exit the application. If XDS_KEEPDIR is set, the temporary directory and its contents are stored in /tmp/XDS_SAVE. If you want to preserve your work, you should be working in a named directory (see below).
13.2.6 Tutorial
This section is a set of step-by-step instructions which demonstrates how to use WorkShop Visual Replay to record interaction with the visu_config tool and then replay those actions.
Note - The tutorial requires no knowledge of visu_config. If, however, you would like more information on this tool, refer to the visu_config - the Main Dialog section on page 479.

Warning - Unless the environment variable XDS_KEEPDIR is defined, the temporary directory (and its contents) is removed automatically when you exit the application. If XDS_KEEPDIR is set, the temporary directory and its contents are stored in /tmp/XDS_SAVE. If you want to preserve your work, you should be working in a named directory (see below).
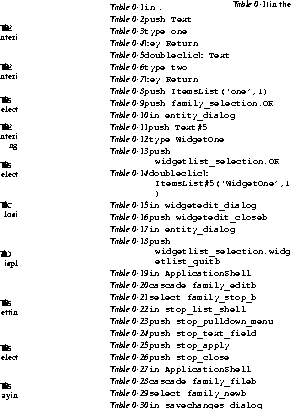
Note - The file you created may not be exactly the same as this one because you may have performed the actions in a slightly different order or you may have made mistakes and gone back to correct them. All of this is recorded.
To add to a script:
Note - You can find out exactly where you are in the script if you have the "Monitor" window open.
Pressing "Insert" is the same as pressing "Record" except that whatever you do you in the application is inserted into the existing script at the current point. When not in Insert mode, pressing "Record" will overwrite whatever was in the script.
Note - Remember when inserting actions into a script that script must be able to continue after the insertion. If this cannot be done, the replay will stop at that point.
Type: visu_record -x to display basic information about the tool.
The following line shows how to use visu_record:
visu_record -f MyRecordScript AnApplicationMyRecordScript is the name of a file into which a script recording the session will be saved. You do not have to supply this parameter. If you do not, the script is written to standard output. AnApplication is the name of the application you wish to record. The -i flag will display the WorkShop Visual Replay dialog.
Type: visu_replay -x to display basic information about the tool.
The following line shows how to use visu_replay:
visu_replay -f MyRecordScript AnApplicationMyRecordScript is the name of a file containing the script of the recorded session. You do not have to supply this parameter. If you do not, the script is read from standard input. AnApplication is the name of the application you wish to rerun. The -i flag will display the WorkShop Visual Replay dialog.
while (true)
{
visu_replay -f mydemo.xds myapplication
}
end
Note - When preparing such a rolling demonstration, always ensure that the last part of your script has commands which place your application in a state from which it can be re-run.
A screen dumping script consists of a set of actions to prepare the application for the screen shot followed by non-application commands which actually do the screen shot. In the example script fragment shown below, a screen dump of the current_shell dialog is taken:
in current_shell
setenv ID WindowFrame(current_shell)
shell xwd -id $ID -out /tmp/current_shell.xwdThe last two lines are extra, non-application, commands. The first sets the variable ID to the current shell window, including its window decorations. The second uses the xwd command to get a snapshot of the shell window and store it. Of course, you can substitute xwd with any other screen dumping command of your choice. The keywords used for setting variables are discussed in the Non-application operations section on page 770.
13.7 Testing
WorkShop Visual Replay is a simple-to-use, portable, and powerful widget-based testing tool. It is intended to provide a testing solution across the whole range of platforms that are supported by WorkShop Visual. 13.7.1 The Role of Widget-based Testing
Most Motif/Xt programming involves reusing the Motif widgets, and using the X Toolkit. WorkShop Visual Replay testing focuses on the Xt widget hierarchy, both for controlling a test sequence and for checking whether a test has succeeded.
Not all testing can be automated in this way. There will always be a need to visually inspect an application to check whether it looks right or whether any graphics programming (e.g. in drawing areas) has worked. While there will always be a requirement for looking and thinking, the widget-based testing strategy ensures that you can focus your attention on those few parts of the application that need it.
Note - This testing technique and strategy is highly resistent to test "rot". Your test results should be the same, whatever the size, shape or quality of the display being used. Tests will only need to be added or updated if the application itself changes. And of course these tests will soon detect any changes which have not been reported to the tester!
13.7.2 The Approach to Testing
Experience has taught us that there are three graduated approaches to the production of a testing script:
StartApplication()
Alternatively you may prefer to build your model in the language used by your application. In this way you guarantee that it is always available when you port your software. The only rule of thumb is that if you feel you're writing a program rather than designing a set of tests, there is almost certainly an easier way.
This testing method is appropriate for most small to medium-sized applications. However, for very large applications (and WorkShop Visual is a good example) fragmentation also has its limitations:
ColorDialog.shell = my_color_shell
ColorDialog.helpbutton = color_help
ColorDialog.applybutton = color_apply
ColorDialog.quit = color_quitThese descriptions can be used each time the dialog needs to be involved in a test, whatever the reason for the test, e.g.
CheckHelpFor(ColorDialog)
Close(ColorDialog)Each procedure listed above is general purpose and can be applied to any dialog we have described.
The definition of Close is shown below:
#define CheckHelpFor(dialog)
in dialog.shell
push dialog.helpbutton
#enddef
#define Close(dialog)
in dialog.shell
push dialog.quit
#enddefThis technique allows you to separate out the description of the interface from the actions which exercise it. It also means that any change to the interface requires only a change to the associated data description - test scripts remain unchanged. If a new dialog is introduced to the application, you simply have to write its description and any non-standard operations which may be performed on or in it.
The biggest advantage of such a strategy is that the description is simple, clear and so close to the design itself that keeping tests in sync with product development becomes a well defined and straightforward exercise.
Automated replay, by itself, is a minimal form of testing. If the sequence replays without error, then you have some measure that what was expected did actually happen. It is minimal because it only tests one potential result of a user action.
Consider the action of opening a file. In a minimal test, the expected result would be that the file is opened and everything progresses smoothly. However, this test is by no means complete. You need to consider other (potential) results, e.g.
Consider the situation where your application displays a message when it is running on a monochrome display but displays no message when it is running on a full color display.
Clearly, you don't want to have a separate test for each display. Instead, you can insert commands at the point where you expect the message to appear and wrap these commands in an if statement, e.g.
if !IsPseudoColor
message Non PseudoColor display
in warning_popup
push warning.OK
endifThis same check will work whatever display hardware or window manager you are using.
The size of application dialogs is also important. Two dialogs shown simultaneously may both be fully visible on one display, overlap on another or be placed one on top of the other on a third. This can result in application-modal warning messages disappearing behind the main dialog, and your application apparently locking-up.
The following test script fragment demonstrates how to handle such a problem:
if !IsVisible(open_file_dialog)
error The Open File dialog is off screen
endifSee the Display Expressions section on page 775 for more information on handling different display types.
If your application exhibits different behavior on different displays, your tests need to be written to accommodate this. For example, the application may put up a warning dialog to tell the user to expect some degradation of display quality.
if !languageOption->menuHistory:'cppButton'
message FAIL: Language option error.
printres languageOption->menuHistory
message expected cppButton
endif
What to do when a test fails
There are three ways to deal with a test failure:
Another useful aid to the location of test failure is the -v command line flag. This displays commands from the script on standard out as they are executed. Once you have located the problem, you can create a smaller script to reproduce it. This can then be used (perhaps in conjunction with your favorite debugger) to identify the problem. It can also be added to your regression test suite to demonstrate that the bug has been fixed.
Example of Scripts Using Macros
In order to illustrate how macros can be used to create modular scripts, an extract from the WorkShop Visual test scripts is listed below as an example. This short script does the following:
The high-level script to do the above is:
include(Defs.m4)
StartUp()
shell date
Palette(xd_XmDialogShell)
Palette(xd_XmForm)
VariableName(myform)
SaveDesignAs(mydesign.xd)
message Test Sequence Over
shell date
Finish()Most of the above script consists of macro calls. See Appendix C, "WorkShop Visual Replay Command Syntax for more details on which part of the syntax are keywords.
The macro definition script, named Defs.m4, looks like this:
define(HandleExpectedWarning,
in warning_popup
push warning.OK)
define(StartUp,
if !IsPseudoColor
message Non PseudoColor display
HandleExpectedWarning()
endif)
define(Palette,
in ApplicationShell
push $1)
define(VariableName,
in ApplicationShell
multiclick nb_vn_t
type $1
key Return)
define(SaveDesignAs,
in ApplicationShell
cascade file_menu
select fm_menu.fm_saveas
in save_dialog_popup
doubleclick Text
type $1
push save_dialog.OK)
define(Finish,
in ApplicationShell
cascade file_menu
select fm_menu.fm_exit
if in save_changes_dialog
push xd_question.xd_question_cancel_b
endif)
The following command:m4 Test.in > Test.xds
creates the final script file which can be passed to WorkShop Visual Replay. The file Test.in is the high-level script and Test.xds is the output file which will contain the final script with expanded macros.visu_replay -f Test.xds visu
You could take this example one step further by defining the names of the widgets on the WorkShop Visual widget palette in a separate file and then defining the "Palette" macro so that it looks up the widget name from a high-level name such as "shell" or "form":define(shell, xd_XmDialogShell)
define(form, xd_XmForm)
In this way the internal names are kept in one place where they can be maintained and changed more easily. 13.7.5 Debugging with WorkShop Visual Replay
Running WorkShop Visual Replay from the command line allows you to provide more than one application name if the application is an indirection. visu_replay -f MyScript dbx AnApplication
would run a dbx session on the application AnApplication. Any debugger can be used. Using WorkShop Visual Replay means that you can reach the stage at which you wish to start debugging quickly. To break into the debugger you can either reach the end of the script or place a "breakpoint" in the script. "breakpoint" is a keyword which is followed by the name of a widget. When the widget is activated, the application breaks into a debugger.
13.8 Extending the WorkShop Visual Replay Widget Set
13.8.1 Overview
WorkShop Visual Replay is based on the principle that the actions which are recorded in a script must be immediately recognizable as user actions.
The same mechanism is used both for widget classes (e.g. third party widgets) and for custom widgets (e.g. the Motif XmDrawingArea widget).
Note - Some widgets provide an easy way to convert between (x,y) coordinates and the internal structure of the widget, e.g. the XmListYToPos function. This is the preferred method. Other widgets provide ways of determining and changing the state of a widget. For example you use XmScrollBarGetValues to record a user action on a scroll bar and XmScrollBarSetValues to replay that action. You can use the converters to program a widget directly if the event strategy is difficult to implement.
13.8.2 Event to Name/Attribute Conversion Routine
Name
xdsXyToNameProc
-
interface definition for procedure used to
convert from an event to a name/attribute description
Synopsis
typedef int (*xdsXYToNameProc) (
Widget widget,
int x,
int y,
char** name_p,
char** attribute_p )
Inputs
Usage
The routine should return 0 on failure, 1 on success. The strings that you assign to name_p and attribute_p are not freed by WorkShop Visual Replay. Since copies are taken, you can use static storage. 13.8.3 Name/Attribute To Event Conversion Routine
Name
xdsNameToXYProc
-
interface definition for procedure used to
convert from a name/attribute description to an event
Synopsis
typedef int (*xdsNameToXyProc) (
Widget widget,
char* name,
char* attribute,
int* x_p,
int* y_p )
Inputs
Usage
The routine should return 0 on failure, 1 on success. Notes
Sometimes it is very easy to program the effect you need to replay directly onto the widget, e.g. by setting a resource value or calling a convenience function, but extremely difficult to mimic the event sequence precisely. In these circumstances, you can handle it yourself in the routine. 13.8.4 An Example
This worked example comes from the WorkShop Visual Replay sources. It is an example of how to register converters for a class of widgets, in this case the Motif XmList widget class. It demonstrates how a click in an XmList widget can be converted to the selection of a particular instance of an element from that list. This is the actual mechanism used for XmList widgets by WorkShop Visual Replay. An example of its use is illustrated in the script fragment below: in my_shell
push my_list_widget(`this line',1)
When the script is replayed, a button click is simulated at the appropriate (x,y) coordinates within the widget.
The contents of this directory are listed below:
The support files provide the framework which allows your shared object to communicate with the WorkShop Visual Replay engine. You do not need to change any of these files.
int
xdsListXyToName( widget, x, y, namep, attrp)
Widget widget;
int x, y;
char ** namep;
char ** attrp;
{
extern Boolean XmStringCompare();
extern char * xdsCvtXmStringToString();
extern Boolean xdsCvtSetListError();
extern int xdsCvtListFailure();
extern Boolean xdsCvtGetXmListEntries();
extern int XmListYToPos();
static char name[255];
static char count[20];
int pos;
int len = 0;
int n;
int instance = 1;
XmString * list = (XmString*)0;
XmString item;
/* get the element */
if (!xdsGetXmListEntries1( widget,&list, &len)) {
return xdsListFailure();
}
/* use XmListYToPos() to get the list element */
pos = XmListYToPos2( widget, (Position)y);
if (pos < 0 || pos > len) {
xdsCvtSetListError(LIST_OUT_OF_BOUNDS);
return xdsCvtListFailure();
}
item = list[--pos];
for (n = 0; n < pos; n++) {
if (XmStringCompare( item, list[n]) == True)
instance++;
}
/* prepare the description */
(void) sprintf ( count, "%d", instance);
(void) strcpy ( name, xdsXmStringToString3(item));
*namep = name;
*attrp = count;
return 1;
}
int
xdsListNameToXy( widget, name, attr, xp, yp)
Widget widget;
char * name;
char * attr;
int * xp;
int * yp;
{
extern char * xdsCvtXmStringToString();
extern Boolean xdsCvtSetListError();
extern int xdsCvtListFailure();
extern int xdsCvtSetListItem();
extern Boolean xdsCvtGetXmListEntries();
Position x, y;
Dimension w, h;
int pos;
int len = 0;
int n;
char * s;
int instance = 1;
XmString * list = (XmString*)0;
XmString item;
if ((instance = atoi(attr)) == 0) {
xdsCvtSetListError(LIST_BAD_INSTANCE);
return xdsCvtListFailure();
}
instance--;
if (!xdsCvtGetXmListEntries( widget, &list, &len)) {
xdsCvtSetListError(LIST_EMPTY_LIST);
return xdsCvtListFailure();
}
for ( n = 0; n < len; n++) {
s = xdsCvtXmStringToString(list[n]);
if (strcmp( name, s) != 0)
continue;
if (instance--)
continue;
break;
}
if (n == len) {
xdsCvtSetListError(LIST_ELEMENT_NOT_FOUND);
return xdsCvtListFailure();
}
(void) xdsCvtSetListItem( widget, n+1);
if (!XmListPosToBounds4( widget, n+1, &x, &y, &w, &h)) {
xdsCvtSetListError(LIST_OUT_OF_BOUNDS);
return xdsCvtListFailure();
}
*xp = x + (w/2);
*yp = y + (h/2);
return 1;
}
void
RegisterWidgets()
{
extern Boolean xdsRegister();
extern int xdsListNameToXy();
extern int xdsListXyToName();
extern int xdsScrollBarNameToXy();
extern int xdsScrollBarXyToName();
extern int xdsScaleNameToXy();
extern int xdsScaleXyToName();
extern int xdsDaNameToXy();
extern int xdsDaXyToName();
	(void) xdsRegister( "XmList", xdsListNameToXy,
xdsListXyToName);
	(void) xdsRegister( "XmScrollBar", xdsScrollBarNameToXy,
xdsScrollBarXyToName);
	(void) xdsRegister( "XmScale", xdsScaleNameToXy,
xdsScaleXyToName);
	(void) xdsRegister( "XmDrawingArea", xdsDaNameToXy,
xdsDaXyToName);
}
void RegisterThisListWidget(
Widget w;
{
	xdsRegisterContextHandler(w, xdsListNameToXy,
xdsListXyToName);
}The function is defined in xdsSetup.h and illustrates the xdsRegisterContextHandler interface definition structure.
Boolean
xdsRegister( classname, name2xy, xy2name)
char * classname;
int_f name2xy;
int_f xy2name;
{
bool_f bf = xdsGetRegisterFunction();
if (!bf)
return False;
return (*bf)( classname, name2xy, xy2name);
}
You only need to change the OBJECT line in the Makefile in order to build the shared object. This should be changed to:
OBJECT = cvt<classname>where classname is the prefix of the widget class. In this example, the widget class is XmList, so we use the Xm prefix, i.e.
OBJECT=cvtXmTo create the shared object, type: make <system>. For example on a Solaris machine, you would type: make solaris. This would create a shared object called libcvtXm.so.
Once the shared object has been built, copy or link it into the directory $VISUROOT/lib/xds. It will then be loaded by WorkShop Visual Replay when required.
The source files for registering converters, together with a Makefile are provided in the $VISUROOT/src/examples/replay/cvtTemplate directory, where $VISUROOT is the location of your WorkShop Visual installation.
The converter registration code is listed below:
int_f _xdsRegisterFunction = (int_f)0;
Boolean
xdsRegisterContextHandler( widget, name2xy, xy2name)
Widget widget;
int_f name2xy;
int_f xy2name;
{
if (!_xdsRegisterFunction)
return False;
	return (*_xdsRegisterFunction)( widget, name2xy, xy2name,
True);
}A call must be made to this function in the application.
The routine for registering converters is described below.
Note - The _xdsRegisterFunction function pointer variable is set to 0. This means that the routine will always return and do nothing in your application when it is run without WorkShop Visual Replay. When you run with WorkShop Visual Replay, the variable is set to point to the Register handler which then gets called.
|
xdsRegisterContextHandler
|
-
|
interface definition for procedure used to register a converter
|
Boolean xdsRegisterContextHandler(
Widget widget,
xdsNameToXYProc name2xy,
xdsXYToNameProc xy2name)
Boolean xdsRemoveContextHandler( Widget widget)
|
widget
|
the widget that will use the routines
|
|
name2xy
|
pointer to a conversion function for replay
|
|
xy2name
|
pointer to a conversion function for record
|
button1 = XmCreatePushButton ( shell1, "button1", al, ac );
xdsRegisterContextHandler(shell1, func1, func2)When replaying, WorkShop Visual Replay will call the func1 routine. When recording, it will call the func2 routine.
The mechanism is available to you either as a source file (client.c), or as a precompiled library module (libxdsclient.a). In the former case, it has to be compiled with your application, in the latter case re-linked with it.
It has no impact on the application itself and can be left in it with no adverse effects.
import allows you to load a module of your own commands explicitly into a script. Once the module has been loaded the commands in it can be invoked using the user command. This section shows you how to produce such a module. The process is similar in many ways to that described in the preceding section.
The source files for the command, together with a Makefile are provided in the $VISUROOT/src/examples/replay/usertemplate directory, where $VISUROOT is the location of your WorkShop Visual installation.
The contents of this directory are listed below:
The support files provide the framework which allows your extra commands to communicate with the WorkShop Visual Replay engine. You only need to change the xdsResources.h file - the remaining files prefixed with xds need not be altered in any way.
make <systemname>
You then copy or link the shared object to the $VISUROOT/lib/xds directory:#include <stdio.h>
#include <X11/Xos.h>
#include <X11/Xlib.h>
#include <X11/Intrinsic.h>
void
exampleHalloWorld( shell, message)
Widget shell;
char * message;
{
if (!message)
message = "no message";
	(void) fprintf ( stderr, "Widget %s says '%s'\n",XtName(shell),
message);
}
As you can see, a user-defined function should have two arguments:
import usertemplate
in ApplicationShell
user HalloWorld I'm hereHere the message is "I'm here".
An entry for the new command is added to the resource list in xdsResources.h, as shown below:
Note - If you would like more information on resource structures, you are advised to consult Chapter 10 in Volume Four of the "X Toolkit Intrinsics Programming Manual" published by O'Reilly and Associates, or any other comparable book.
{
		"HalloWorld", XtCCallback, XtRPointer,
sizeof(XtPointer), XtOffsetOf(data_t,HalloWorld), XtRImmediate,
(XtPointer)exampleHalloWorld
}Only three items are of significance within this code:
typedef struct {
int type;
XtPointer setValues;
XtPointer getValues;
XtPointer engineSetValues;
XtPointer engineGetValues;
/*-----------------------*/
XtPointer HalloWorld;
} data_t;Entries above the line in the data structure are common to all WorkShop Visual Replay objects.
The last thing to do in this file is to declare the function:
extern void exampleHalloWorld();
OBJECT=usertemplateand then build the module by typing:
make solarisFinally, we copy or link the shared object we have built to the $VISUROOT/lib/xds directory:
cp libusertemplate.so $VISUROOT/lib/xdsThat is all there is to it.
2 XmListYToPos() - the Motif convenience function XmListYToPos( widget, y) does all the conversion that we need. It takes the y-coordinate of the event, and returns its position in the list.
3 xdsXmStringToString() - a routine to convert an XmString to a String.
4 XmListPosToBounds() - the Motif convenience function, XmListPosToBounds(), gives us the window bounding-box of a particular item in the list. This can be used to work out likely (x,y) coordinates for a click on that element.