TeamWare Configuring Workspace |
7 |
 |
The Workspace Metadata Directory
A Configuring workspace is a directory hierarchy that contains a directory named Codemgr_wsdata in its root directory. the Configuring program stores data (metadata) about that workspace in Codemgr_wsdata. Configuring commands use the presence or absence of this directory to determine whether a directory is a workspace.
Creating a Workspace
You can create a workspace in one of two ways:
If the workspace you are creating already exists as a directory hierarchy, Configuring converts it to a workspace by simply adding the Codemgr_wsdata directory in the root directory and displaying its icon in the Workspace Graph Pane.
If the directory does not already exist, Configuring creates both the root directory and the Codemgr_wsdata directory.
The online Help provides further assistance in Creating New Workspaces. To access the help, choose Help
 Help Contents Starting a Project.
Deleting a Workspace
You delete workspaces by selecting their icons in the Workspace Graph Pane and then invoking the Delete  item from the Configuring Edit menu.
When you choose the Sources and Codemgr_wsdata Directory command, you are prompted to confirm your decision.
A Note About Moving Workspaces
The Configuring Rename command updates files in the workspace's parent and children, as well as logging the event in the Codemgr_wsdata/history file.
Caution - Do not use the SunOS mv command to rename or move workspaces.
This section discusses how you can explicitly change a workspace's parent. It is also possible for you to implicitly change a workspace parent "on the fly" (for the duration of a single command) by specifying the new parent's path name as part of a Bringover Update or Putback transaction. See the descriptions of the Bringover Update and Putback transactions in "Copying Files between Workspaces" on page 83 for more information.
The following sections describe:
You may also "orphan" a workspace by selecting its icon, pressing SHIFT, and dragging it to an open area on the Workspace Graph. The workspace no longer has a parent: the display is automatically adjusted to reflect its new status.
Note - You are prompted to confirm the change.
When the window is initially activated, the New Parent Workspace Directory text field contains the name of the current parent; edit that line so that it contains the name of the new parent file. Click SELECT on the Parent button. The Workspace Graph Pane is automatically adjusted to reflect the new relationship.
If you do not specify a parent workspace in the New Parent Workspace Directory text field, the workspace is orphaned--it has no parent. The Workspace Graph Pane is automatically adjusted to reflect its new status.
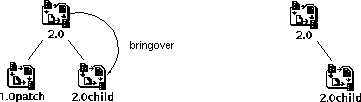
In the following example, a patch is developed to fix a bug in Release 1.0 of a product. The patch must be incorporated into Release 2.0, which has begun development.
 )
)
Sources and Metadata item from the Edit menu. (Figure 7-3)
Prior to taking any of the actions listed above, the Configuring program consults a file in the Codemgr_wsdata directory named access_control to determine whether the user taking the action has access permission to the workspace for that purpose. The access_control file is a text file that contains a list of the eight operations and corresponding values that stipulate who is permitted to perform those operations. The access_control file is automatically created at the time the workspace is created and is owned by the creator of the workspace.
Table 7-3 shows the default contents of access_control after you create a workspace:
You can express which users have or do not have access to a workspace in a number of ways. Table 7-4 shows all of the value types you can specify to control access to your workspaces and what the entries mean.
Note - Creator permission indicates that Creator's login name appears.
Note - If a user is listed as having both access permission and restriction, the first reference is used.
Note - Performance may degrade when net groups are included in the access control file. The time required to look up group membership can add several seconds to the execution of a given operation.
Viewing and Changing Access Control Values
 |
To view the access control status of a workspace, do the following: |
| |
To change the access control status of a workspace, do the following: |
A notification request consists of the following items:
chip@mach1 bringover-to BEGIN dir1/foo.cc dir2 END biff@mach2 bringover-to putback-to BEGIN . END biff@mach2 workspace-move |
In the first entry, the user chip@mach1 requests to be notified when the file dir1/foo.cc and any file in the directory dir2 (path names are relative to the workspace root directory) are brought over to the workspace.
In the second entry, user biff@mach2 requests to be notified when any file in the workspace is brought over to, or put back to, the workspace. The "." character represents all files in the workspace.
Note - File and directory entries for each event are bracketed by BEGIN/END statements. An empty list, a missing list, or a list that consists of only the "." character indicate that all files and directories in the workspace are registered for notification.
Viewing and Changing Notification Entries
To view and change notification entries, select a workspace icon in the Workspace Graph pane and choose the Workspace item from the base window Options menu. Use the Category menu to choose the Notification pane. The requests contained in the notification file described on the previous page will be similar to those displayed in the Workspace Properties pop-up.
Apply changes to the Notification Edit pop-up changes to the global Notification list, by clicking on the Apply button.
Apply changes to the notifications file, by clicking on the Set Default button in the Workspace Properties pop-up.
You can view the contents of this file to track or reconstruct changes that have been made to a workspace over time. Log entries consist of the underlying command-line entries and do not correspond to GUI menu item names. If you have any questions about the meaning or syntax of a command, refer to its man page for details. Table 7-6 lists the GUI operations and the corresponding CLI command that is entered in the history log.
Note - Although command entries are logged in both the source and destination workspaces, the list of changed files is entered only in the destination directory.
The following portion of a history file was generated during a Bringover Update transaction; entries are described in Table 7-7. This entry is taken from the history file in the child; the corresponding entry in the parent is identical except that file status messages are not included.
Note - In active workspaces, the Codemgr_wsdata/history file can grow very quickly. You may want to periodically prune the file to reduce its size.
Ensuring Consistency through Workspace Locking
To assure consistency, the Configuring transactions--Bringover, Undo, and Putback--lock workspaces while they are working in them. These locks only affect Configuring transactions; other commands such as SCCS programs, are not affected. Locks are recorded in the Codemgr_wsdata/locks file in each workspace; the Configuring transaction commands consult that file before acting in a workspace. Two types of locks are used:
To view and delete locks using the Configuring GUI, select a workspace icon from the Workspace Graph pane and choose the Workspace item from the main Props menu. Use the Category menu to choose the Locks pane.
To delete locks, select the line that contains the lock and click on the Delete button. To apply the deletion to the locks file, click on the Set Default button.