Previous Next Contents Index Doc Set Home


Copying Files between Workspaces

8


Chapter 3, "Introduction to TeamWare Configuring", describes copying files up and down the parent/child hierarchy. This chapter describes how you use Configuring to copy files.

The chapter covers the following topics:

Configuring Transaction Model

page 83

General File Copying Information

page 84

Copying Files from a Parent to a Child Workspace (Bringover)

page 89

Copying Files from a Child to a Parent Workspace (Putback)

page 99

Reversing Bringover and Putback Transactions with Undo

page 105

Renaming, Moving, or Deleting Files

page 108

An example demonstrating these transactions can be found in Chapter 12, "Configuring Example" on page 143.


Configuring Transaction Model

Configuring is designed so that all interworkspace transactions (Bringover Create, Bringover Update, Putback, Undo, and Resolve) are based upon the same user model; that model is described in Figure 8-1. The ways in which the transactions differ are described later in this chapter (the Resolve transaction is described in Chapter 9, "Resolving Conflicts").

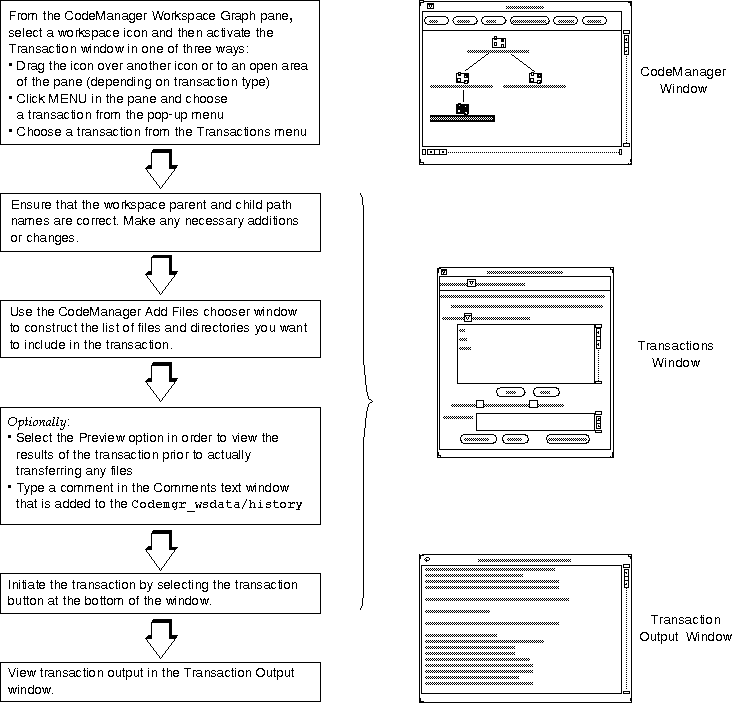
Figure  8-1 Configuring Transaction Model


General File Copying Information

This section contains background information about copying files between workspaces.

SCCS History Files

When considering Configuring file transfer transactions, it is important to remember that source files are actually derived from SCCS deltas and are identified by SCCS delta IDs (SIDs). When a file is said to be copied by either a Putback or Bringover transaction, Configuring actually acts upon (copies or merges) the file's SCCS history file (also known as the "s-dot-file").

The means by which Configuring manipulates and merges the history files is described in detail in Chapter 11, "How the Configuring Program Merges SCCS Files." For specific technical information, refer to sccsfile(4).

Viewing Transaction Output

Output from Configuring transaction commands is viewed in the Transaction Output window. This window is activated automatically when you invoke one of the transactions. You can also activate it yourself by choosing the Show Output button in any of the Transactions window layouts. Check the online Help for details on TeamWare windows.


Note - Configuring transactions are implemented through command-line based programs; some portion of the output contains messages related to the command-line implementation. This manual describes only messages that apply to the actual transactions. If you are interested in more information about the underlying command-line based programs, please refer to the appropriate man pages.

Specifying Directories and Files for Transactions

When you copy files between parent and child workspaces using the Bringover and Putback transactions, you must specify the directories and files you wish included in the transaction. The Bringover Create, Bringover Update, and Putback layouts of the Transactions window contain a File List pane. The File List pane is a scrolling text window in which you construct the list of file and directory names to be included in the transaction. You can accept the default "." convention to bringover or putback all files in a workspace.

Grouping Files for Transfer Using File List Programs

In addition to explicitly specifying files for transfer, you can execute programs that generate that list for you -- such a program is called a File List Program (or FLP). An FLP generates a list of files to stdout; the Bringover and Putback transactions read the list of files from stdout and include them in the transaction.

Configuring is shipped with a default FLP named def.dir.flp. The FLP def.dir.flp recursively lists the names of files that are under SCCS control in directories that you specify in the File List pane (see next section). The files generated by this (or any) FLP are included for transfer with files that you also specify in the File List pane.

If you want to use your own FLPs during a transaction, you can specify their path names in the File List pane. The File List pane is used for both specifying file/directory lists and for specifying FLPs. Use the abbreviated menu immediately above the pane to change between the two modes. Add FLPs to the list using the point-and-click chooser window that is activated by choosing the Add FLPs to List item in the File menu (located below the File List pane). See "Add Files Chooser" on page 88 for more information.


Note - You can create your own FLPs that generate lists of files that are useful for your project.

Constructing Directory and File Lists in the File List Pane

Configuring attempts to provide you with a useful initial list of directories and files in the File List pane. You are free to modify the list in any way you wish. The initial list is constructed differently for each type of transaction:

Bringover Create

The initial list is empty.

Bringover Update

The initial list is retrieved from the Codemgr_wsdata/args file in the child workspace. This file contains a list of arguments specified during previous Bringover and Putback transactions.

Putback

The initial list is retrieved from the Codemgr_wsdata/args file in the child workspace. This file contains a list of arguments specified during previous Bringover and Putback transactions.

Every workspace contains a Codemgr_wsdata/args file that is maintained by the Configuring Bringover and Putback transaction commands. The args file contains a list of file, directory, and FLP arguments. Initially, the args file contains the arguments specified when the workspace was created. If you explicitly specify arguments during subsequent Bringover or Putback transactions, Configuring determines if the new arguments are more encompassing than the arguments already in the args file; if the new arguments are of a wider scope, the new arguments replace the old.


Note - You can edit the args file at any time to change its contents.
Selecting Files in the File List Pane
Once a list of files and directories exists in the File List pane, you can include or exclude any of them for a given transaction. To be included in a transaction, the file or directory name must be selected. You can select or deselect any number of names by moving the pointer over them and clicking SELECT. You can select or deselect the entire list by choosing the Select List or Unselect List items from the Edit menu.

Loading and Saving Default Lists
You can reload the default list from the workspace args file at any time by choosing the "Load List from Defaults" item from the File menu. This feature is useful if you find that you've made changes to the list that you do not want to keep; you can use Load List from Defaults to revert the list to its default state.

If you change the default list and wish to make the new list the default in the workspace args file, choose the "Save List to Defaults" item from the File menu. This is especially useful if you have eliminated files or directories from the list. If you add files, Configuring automatically adds them to the args file for you as part of a Bringover or Putback transaction.

Changing the Contents of the File List Pane
You add files and directories to the File List pane by using the point-and-click, Configuring Chooser. See "Add Files Chooser" on page 88 for details.

You delete files and directories from the File List pane using:


Note - You can specify the "." directory as the sole item in the file list to designate that the entire workspace be copied to the child. Enter the "." character using the Name text field in the Configuring Chooser.
Add Files Chooser
You can use the Add Files chooser to conveniently add directories and files to the Transaction window File List pane. The Configuring chooser is a pop-up window that contains a point-and-click chooser pane that you can use to search for and select directories and files. Activate the chooser window using the Add Files to List item in the File menu.


Note - The Configuring Chooser is also used to add FLPs to the File List pane. The appropriate version of the chooser is automatically invoked when you change the File List pane mode using the abbreviated menu immediately above the pane.
Use the chooser to navigate down through the file system hierarchy by double-clicking SELECT on any directory icon. Double-click SELECT on the directory icon to move hierarchically upward in the file system. To move directly to a directory, enter its path name in the Name text field and select the Load Directory button.


Note - The chooser does not permit you to navigate outside of the workspace file system.
To add a file or directory to the File List pane:

1. Select files and directories by moving the pointer over any file or directory icon and clicking SELECT.

You can extend the selection to include any number of additional files and directories by moving the pointer over them and clicking ADJUST.

You can select entire groups of files by clicking and holding SELECT in an empty portion of the chooser and dragging the bounding box to surround any number of icons. When you release the button, all the files within the bounding box are selected.

You can also add a file to the File List pane by specifying its path name in the Name text field. If you type Return, the entry will be entered immediately; you may also enter it by choosing the Add Files to List button.

2. Select the Add File to List button to add the file to the File List pane.


Note - A check mark in a file icon indicates that the file is checked out from SCCS.


Copying Files from a Parent to a Child Workspace (Bringover)

All Configuring file transfer transactions are performed from the perspective of the child workspace; hence Bringover transactions "bring over" groups of files from the parent to the child workspace. There are two types of Bringover transactions:

Bringover Create

Copy groups of files from a parent workspace to a nonexistent child workspace; the child is created as a result of the Bringover Create transaction.

Bringover Update

Copy files to an existing workspace; the contents of the child are updated as result of the Bringover Update transaction.


Note - You can use the Bringover Update and Create transactions to import directories and files from directories that are not Configuring workspaces. You cannot Putback files to directories that are not workspaces.

Creating a New Child Workspace (Bringover Create)

You use the Configuring Bringover Create transaction to copy groups of files from a parent workspace to a child workspace that is created as a result of the Bringover transaction. You can display the Bringover Create layout of the Transactions window by any of the following methods:

The Bringover Create transaction operates on files that are under SCCS control. When files are said to be copied to the child, the SCCS history file is copied and its g-file (the most recent delta) is created through the SCCS get command.

To initiate a Bringover Create transaction, follow these five basic steps:

1. Specify the parent workspace.

If you select a workspace icon on the Workspace Graph pane prior to displaying the Bringover Create window, its path name is automatically inserted in the From Parent Workspace Directory text field. You can edit and change the contents of the text field by hand at any point. You can specify the absolute path name of any accessible workspace; it need not be displayed in the Workspace Graph pane.


Note - You can also specify the path name of directories that are not workspaces to import directories and files into the new workspace.

2. Specify the child workspace.

Type the absolute path name of the child that will be created and populated with files from the parent workspace in the To Child Workspace Directory text field.

3. Create a list of directory and file names in the File List Pane.

You can copy all or part of the contents of the parent workspace to the child. You specify the directories and files you wish to copy in the File List pane. See "Specifying Directories and Files for Transactions" on page 85 for information about specifying directory and file arguments.


Note - If you are using your own FLPs to generate file lists, you also specify them in the File List pane. Refer to the Sun WorkShop TeamWare: Solutions Guide for examples of how to use CodeManager FLPs.

4. Select options.

Preview

Select this option to preview the results of the trans-action. If you invoke the Bringover Create transaction with this option selected, the transaction will proceed without actually transferring any files. You can monitor the output messages in the Transaction Output window (Show Output) as if the transaction were actually proceeding.

Verbose

Select this option to increase the information dis-played in the Transaction Output window. By default, a message is displayed for each created, updated, or conflicting file. The Verbose option causes bringover to print a message for all files, including those that are not brought over. If both the Verbose option and the Quiet option are specified, the Quiet option takes precedence.

Quiet

Select this option to suppress the output of status messages to the Transaction Output window (Show Output).

Skip SCCS gets

Select this option to inhibit the automatic invocation of the SCCS get program as part of the Bringover transaction. Normally g-files are extracted after they are brought over. This option improves file transfer performance although it shifts the responsibility to the user to do the appropriate gets at a later time.

Force Conflicts

Select this option to cause all updates to be treated as conflicts. This option is not applicable to the Bringover Create transaction, but is applicable to the Bringover Update transaction.

5. Select the Bringover button to initiate the transaction.

Notes about the Bringover Create Transaction

When, during a Bringover Create transaction, Configuring encounters files that are checked out from SCCS in the parent, it takes action based on preserving the consistency of the files and any changes to the file that might be in-process.

Table 8-1 shows the different actions that Configuring takes when it encounters checked-out files.

Table  8-1 Effects of Checked-out Files on Bringover Create Transactions

File Checked-out
in Parent

Configuring Action

g-file and latest
delta differ

Issue a warning

Process file

g-file and latest
delta are identical

Process file

Read-locks may be obtained concurrently by multiple Configuring commands that read files in the workspace; no commands may write to a workspace while any read-locks are in force. Only a single write-lock can be in force at any time; no Configuring command may write to a workspace while a write-lock is in force. Lock status is controlled by the Codemgr_wsdata/locks file in each workspace.

If you attempt to bring over files into a workspace that is locked, you will be so notified with a message that states the name of the user that has the lock, the command they are executing, and the time they obtained the lock.

bringover: Cannot obtain a write lock in workspace 
"/tmp_mnt/home/my_home/projects/mpages"
because it has the following locks:
	Command: bringover (pid 20291), user: jack, machine: holiday, 
time: 12/02/91 16:25:23
  (Error 2021)

Updating an Existing Child Workspace (Bringover Update)

You use the Configuring Bringover Update transaction to update an existing child workspace. You can display the Bringover Update layout of the Transactions window by any of the following methods:

The Bringover Update transaction transfers files that are under SCCS control. When a file exists in the parent workspace but not in the child, its SCCS history file is copied to the child and its g-file (the most recent delta) is created through the SCCS get command. When a file exists in both workspaces and has changed only in the parent, Configuring copies the new deltas from the parent to the child. When a file has changed in both workspaces, Configuring moves the child's new deltas into an SCCS branch.

To initiate a Bringover Update transaction follow these five basic steps:

1. Specify the child workspace.

If you select a workspace icon on the Workspace Graph pane prior to displaying the Bringover Update window, its name is automatically inserted in the To Child Workspace Directory text field. You can insert new path names, and edit and change the text field by hand at any point.

2. Specify the parent workspace.

The name of the selected child's parent workspace is automatically inserted in the From Parent Workspace text field. The parent workspace name is retrieved from the Configuring metadata file named Codemgr_wsdata/parent.


Note - You can also specify the path name of directories that are not workspaces to import files and directories into the workspace.

You can change a child workspace's parent for the duration of a single Bringover Update transaction by specifying the new parent's path name in the From Parent Workspace text field. You change the parent for that transaction only; if you wish to permanently change a workspace's parent, use the Reparent item on the Configuring window Edit menu or drag the child workspace icon over the new parent's icon. See "Reparenting a Workspace" on page 66 for details regarding reparenting workspaces.


Note - If you enter the child workspace name by hand and no icons are selected in the Workspace Graph pane, Configuring automatically updates the parent field if you rechoose the Bringover Update item in the Category menu.

3. Create a list of directory and file names in the File List Pane.

You can copy all or part of the contents of the parent workspace to the child. You specify the directories and files you wish to copy in the File List pane. See "Specifying Directories and Files for Transactions" on page 85 for information about specifying directory and file arguments.


Note - If you are using your own FLPs to generate file lists, you also specify them in the File List pane.

4. Select options.

Preview

Select this option to preview the results of the trans-action. If you invoke the Bringover Create transaction with this option selected, the transaction will proceed without actually transferring any files. You can monitor the output messages in the Transaction Output window (Show Output) as if the transaction were actually proceeding.

Verbose

Select this option to increase the information dis-played in the Transaction Output window. By default, a message is displayed for each created, updated, or conflicting file. The Verbose option causes bringover to print a message for all files, including those that are not brought over. If both the Verbose option and the Quiet option are specified, the Quiet option takes precedence.

Quiet

Select this option to suppress the output of status messages to the Transaction Output window (Show Output).

Skip SCCS gets

Select this option to inhibit the automatic invocation of the SCCS get program as part of the Bringover transaction. Normally g-files are extracted after they are brought over. This option improves file transfer performance although it shifts the responsibility to the user to do the appropriate gets at a later time.

Force Conflicts

Select this option to cause all updates to be treated as conflicts. This option is not applicable to the Bringover Create transaction, but is applicable to the Bringover Update transaction.

5. Invoke the Bringover button to initiate the transaction.

Notes about the Bringover Update Transaction

When, during a Bringover Update transaction, Configuring encounters files that are checked-out from SCCS, it takes action based on preserving the consistency of the files and any changes to the file that might be in process.

Table 8-2 shows the different actions that Configuring takes when it encounters checked-out files.

Table  8-2 Effects of Checked-out Files on Bringover Update Transactions

File Checked-out
in Parent

File Checked-out
in Child

Configuring Action

g-file and latest
   delta differ


Issue a warning

Process file

g-file and latest
   delta are identical


Process file


g-file and latest
   delta are identical

Uncheckout the file

Process the file

Checkout the file


g-file and latest
   delta differ

Create a conflict


g-file is readonly

Issue a warning

Do not process the file

Read-locks may be obtained concurrently by multiple Configuring commands that read files in the workspace; no commands may write to a workspace while any read-locks are in force. Only a single write-lock may be in force at any time; no Configuring command may write to a workspace while a write-lock is in force. Lock status is controlled by the Codemgr_wsdata/locks file in each workspace.

If you attempt to bring over files into a workspace that is locked, you will be so notified with a message that states the name of the user that has the lock, the command they are executing, and the time they obtained the lock.

bringover: Cannot obtain a write lock in workspace 
"/tmp_mnt/home/my_home/projects/mpages"
because it has the following locks:
	Command: bringover (pid 20291), user: jack, machine: holiday, 
time: 12/02/91 16:25:23
  (Error 2021)

Bringover Action Summary

Table 8-3 summarizes the actions that Configuring takes during Bringover transactions.


Table  8-3 Summary of Configuring Action during a Bringover Transaction

File in Parent
File in Child
Action by Configuring

Exists

Does not exist

Create the file in the child

Does not exist

Exists

None

Unchanged

Unchanged

None

Unchanged

Changed

None

Changed

Unchanged

Update file in the child. (Merge SCCS files and extract [via get] a g-file that consists of the most recent delta.)

Changed

Changed

Merge SCCS history files in the child, create conflict, and notify user of the conflict. Current line of work in the child is moved to an SCCS branch.


Copying Files from a Child to a Parent Workspace (Putback)

All Configuring file transfer transactions are performed from the perspective of the child workspace; hence the Putback transaction "puts back" groups of files from the child to the parent workspace.

You use the Putback transaction to make the parent and child workspace identical with respect to the set of files that you specify for the Putback transaction. Use the Putback transaction after you make changes and test them in the child workspace. Putting the files back into the parent usually makes them accessible to other developers.

During a Putback transaction, Configuring may find that it cannot transfer files from the child to the parent workspace without endangering the consistency of the data in the parent. If this occurs, no files are transferred and the Putback transaction is said to be blocked. A Putback transaction is blocked because:

The Putback transaction transfers files that are under SCCS control. When a file exists in the child workspace but not in the parent, its SCCS history file is copied to the parent and its g-file (the most recent delta) is materialized through the SCCS get command. When a file exists in both workspaces and has changed only in the child, Configuring copies the new deltas from the child to the parent. When a file has changed in the parent, or both the parent and child, the Putback transaction is blocked.

Updating a Parent Workspace Using Putback

You can display the Putback layout of the Transactions window by any of the following methods:

To initiate a Putback transaction, follow these steps:

1. Specify the child workspace.

If you select a workspace icon on the Workspace Graph pane prior to displaying the Putback window, its name is automatically inserted in the From Child Workspace Directory text field. You can insert new path names, and edit and change the text field at any point.

2. Specify the parent workspace.

The name of the selected child's parent workspace is inserted in the From Parent Workspace text field. The parent workspace name is retrieved from the Configuring metadata file named Codemgr_wsdata/parent.

You can change a child workspace's parent for the duration of a single Putback transaction by specifying the new parent's path name in the To Parent Workspace text field. You change the parent for that transaction only; if you wish to permanently change a workspace's parent, use the Reparent item on the Configuring window Edit menu or drag the child workspace icon over the new parent's icon. See "Reparenting a Workspace" for details regarding reparenting workspaces.


Note - If you enter the child workspace name by hand and no icons are selected in the Workspace Graph pane, Configuring automatically updates the parent field if you rechoose the Putback item in the Category menu.

3. Create a list of directory and file names in the File List Pane.

You can copy all or part of the contents of the parent workspace to the child. You specify the directories and files you wish to copy in the File List pane. See "Specifying Directories and Files for Transactions" for information about specifying directory and file arguments.


Note - If you are using your own FLPs to generate file lists, you also specify them in the File List pane.

4. Select options.

Preview

Select this option to preview the results of the trans-action. If you invoke the Bringover Create transaction with this option selected, the transaction will proceed without actually transferring any files. You can monitor the output messages in the Transaction Output window (Show Output) as if the transaction were actually proceeding.

Verbose

Select this option to increase the information dis-played in the Transaction Output window. By default, a message is displayed for each created, updated, or conflicting file. The Verbose option causes bringover to print a message for all files, including those that are not brought over. If both the Verbose option and the Quiet option are specified, the Quiet option takes precedence.

Quiet

Select this option to suppress the output of status messages to the Transaction Output window (Show Output).

Skip SCCS gets

Select this option to inhibit the automatic invocation of the SCCS get program as part of the Bringover transaction. Normally g-files are extracted after they are brought over. This option improves file transfer performance although it shifts the responsibility to the user to do the appropriate gets at a later time.

Auto Bringover

Select this option to cause Configuring to automatically start a Bringover Update transaction to update files in the child if the Putback transaction is blocked.

5. Enter a comment.

Enter a comment that describes the Putback transaction. This comment is included with the transaction log written into the file called Codemgr_wsdata/history in the parent workspace. The comment can be up to 8 Kbytes long.

6. Invoke the Putback button to initiate the transaction.

Notes about the Putback Transaction

When, during a Putback transaction, Configuring encounters files that are checked-out from SCCS, it takes action based on preserving the consistency of the files and any changes to the file that might be in-process.

Table 8-4 shows the different actions that Configuring takes when it encounters checked-out files.

Table  8-4 Effects of Checked-out Files on Putback Transactions

File Checked-out
in Parent

File Checked-out
in Child

Configuring Action

g-file and latest
   delta differ

Block Putback transaction

g-file and latest
   delta are identical

   or g-file does not
   exist)

Uncheckout the file

Process the file

Check-out the file

g-file and latest
   delta differ

Block Putback transaction

g-file and latest
   delta are identical

Process the file

g-file does not exist

Issue a warning

Process the file

No changes made

Read-locks may be obtained concurrently by multiple Configuring commands that read files in the workspace; no commands may write to a workspace while any read-locks are in force. Only a single write-lock may be in force at any time; no Configuring command may write to a workspace while a write-lock is in force. Lock status is controlled by the Codemgr_wsdata/locks file in each workspace.

If you attempt to put back files into a workspace that is locked, you are notified with a message such as the following that states the name of the user that has the lock, the command they are executing, and the time they obtained the lock.

putback: Cannot obtain a write lock in workspace 
"/tmp_mnt/home/my_home/projects/mpages"
because it has the following locks:
	Command: bringover (pid 20291), user: jack, machine: holiday, 
time: 12/02/91 16:25:23
  (Error 2021)

Putback Action Summary

Table 8-5 summarizes the actions that Configuring takes during Putback transactions.


Table  8-5 Summary of Configuring Action during a Putback Transaction

File in Parent
File in Child
Action by Configuring

Exists

Does not exist

Block Putback and notify user.

Does not exist

Exists

Create the file in the parent.

Unchanged

Unchanged

None.

Unchanged

Changed

Update file in the parent. (Merge SCCS files and extract [via get] a g-file that consists of the most recent delta.)

Changed

Unchanged

Block Putback, notify user.

Changed

Changed

Block Putback, notify user.

Checked out

Checked out*

Block Putback, notify user.

Unresolved conflict

Unresolved conflict**

Block Putback, notify user.

*If a file is checked out in either the parent or the child, the transaction is blocked. See Table 8-4 for more information about putting back files that are checked out.

**If a conflict is unresolved in either the parent or the child, the transaction is blocked.


Reversing Bringover and Putback Transactions with Undo

You can reverse (undo) the action of the most recent Bringover or Putback transaction in a workspace by using the Undo Transactions window layout. You Undo the Putback or Bringover transaction in the destination workspace (the one in which the files are changed). You can undo a Bringover or Putback transaction as many times as you like until another Bringover or Putback transaction makes changes in that workspace; only the most recent Bringover/Putback transaction can be undone.

If a file is updated or found to be in conflict by the Putback or Bringover transaction, the Undo transaction restores the file to its original state. If a file is "new" (created by the Bringover/Putback transaction), then it is deleted.

To initiate an Undo transaction, follow these three basic steps:

1. Specify the workspace in which to reverse the transaction.

If you select a workspace icon on the Workspace Graph pane prior to displaying the Undo layout, its name is automatically inserted in the Workspace Directory text field. You can insert a new path name followed by a Return, and edit and change the text field by hand at any point.

2. Click on the Undo button to initiate the transaction.

Notes about the Undo Transaction

How the Undo Transaction Works

When the Bringover and Putback transactions update or create files in the destination workspace (the child in the case of Bringover, the parent in the case of Putback), they make backup copies of the originals before they actually make changes to the files. All existing files are copied to the Codemgr_wsdata/backup/files directory in the destination workspace, and the names of all newly created files are entered into a file called Codemgr_wsdata/backup/new.

When you decide that you would like to cause a workspace to revert to its state before a Bringover/Putback transaction, the Undo transaction does the following:

The next Bringover/Putback transaction overwrites all data in the Codemgr_wsdata/backup directory.


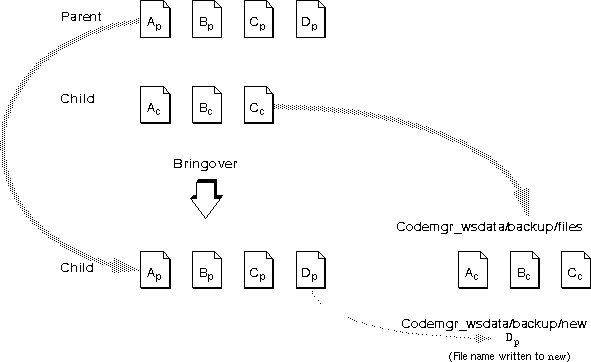
Note - All files transferred by Configuring are under SCCS control. Usually, only SCCS history files are backed up during Bringover and Putback transactions; if the files are subsequently restored, the Undo transaction extracts the appropriate g-file (most recent delta) from the history file. If, however, a file in the child is checked out (using sccs edit) during the Bringover transaction (Configuring permits files to be checked out during a Bringover transaction, but not during a Putback transaction. If a file that is being put back is checked out, an error condition exists). Configuring backs up both the g-file and the SCCS history file in order to preserve the work in progress; the g-file and the SCCS history file are copied to the Codemgr_wsdata/backup/files directory and restored by the Undo transaction.


Renaming, Moving, or Deleting Files

When you rename, move, or "delete" files as described in this section, Configuring tracks those changes so that it knows how to manage the altered files during Bringover and Putback transactions. Although Configuring processes these files automatically, it is helpful for you to understand some of the ramifications of renaming, moving, or deleting files.


Note - For the purposes of this discussion, the terms "rename" and "move" are considered to be the same action and are referred to only as "rename."
The best way to delete and rename files is to use the move and delete commands available from the Workshop Versioning menu. This section describes the underlying process.

Renaming Files

When you bring over or put back files that you (or another user) have renamed, Configuring must decide whether the files have been newly created or whether they existed previously and have been renamed.

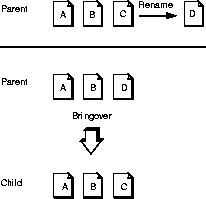
For example, in the following figure, the name of file C in the parent is changed to D. When Configuring brings the file over to the child it must decide which of the following is true:

Figure  8-2 File "C" Renamed to "D"
If the same case was the subject of a Putback operation, the same problem would apply: Is "C" new in the child, or has it been renamed from some other file?

The action that Configuring takes is very different in each case. If it is a new file in the parent, Configuring creates it in the child; if it has been renamed in the parent, Configuring renames file "C" to "D" in the child.

Configuring stores information in the SCCS history files that enables it to identify files even if their names are changed. You may have noticed the following message when viewing Bringover and Putback output:

Examined files:

Configuring examines all files involved in a Bringover Update or Putback transaction for potential rename conditions before it begins to propagate files.

When Configuring encounters renamed files, it propagates the name change to the child in the case of Bringover, and to the parent in the case of Putback. You are informed of the change in the Transaction Output window with the following messages:

rename from: old_filename
         to: new_filename

Name History

Configuring stores information about a file's name history in its SCCS history file. The name history is simply a list of the workspace-relative names that have been given to the file during its lifetime. This information is used by Configuring to differentiate between files that have been renamed and those that are new. When you rename a file, Configuring updates the file's name history during the next Bringover or Putback transaction that includes it. When a name history is updated, you are notified in the Transaction Output window.

Names Summary:
			1	updated parent's name history
			1 	updated children's name history

Rename Conflicts

In rare cases, a file's name is changed concurrently in parent and child workspaces. This is referred to as a rename conflict. For example, the name of file "C" is changed to "D" in the parent, and concurrently to "E" in the child.

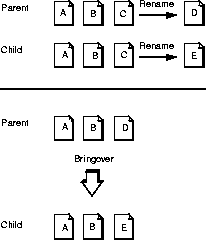
Figure  8-3 File "C" is Concurrently Renamed in both Parent and Child Workspaces
When this occurs, Configuring determines that both "D" in the parent and "E" in the child are actually the same file, but with different names. In the case of rename conflicts:

When Configuring encounters a rename conflict, you are notified in the Transaction Output window with the following messages:

rename conflict: name_in_child
rename from: name_in_child
         to: name_in_parent

Deleting Files

Deleting files from a Configuring workspace is a little trickier than it first appears. Deleting a file from a workspace with the rm command causes Configuring to think that the file has been newly created in the workspace's parent or child.

Take for instance, the following example. The file "C" is removed from the child workspace using the rm command; later the Bringover Update transaction is used to update the child.

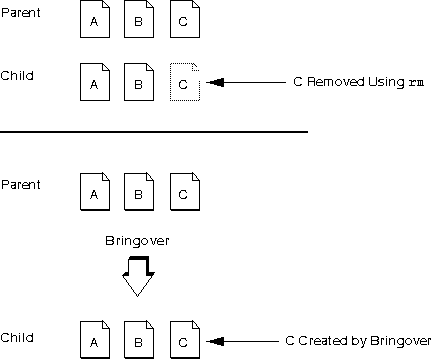
Figure  8-4 File "C" Is Removed From The Child Using the rm Command, Then Created Again by Bringover
Configuring examines the two workspaces and determines that the file "C" exists in the parent and not in the child -- following the usual Configuring rules, it creates "C" in the child.

The recommended method for "deleting" files in workspaces is to rename them out of the way using a convention agreed upon by everyone working on the project. One recommended method is to rename files you wish to "delete" so that they begin with the.del- prefix.

example% mv module.c .del-module.c
example% mv SCCS/s.module.c SCCS/s..del-module.c

For example:

This method has a number of advantages:

Notes about Renaming Files


Previous Next Contents Index Doc Set Home