Previous Next Contents Index Doc Set Home


Building Programs in Sun Workshop

3


Sun WorkShop provides you with the ability to run one build job at a time or you can run several build jobs concurrently. This chapter shows you how to quickly build a single application (with or without WorkShop's default build settings) and how to fix build errors using the Building window and the WorkShop editor of your choice.

This chapter is organized into the following sections:

Building a WorkShop Target

page 19

Building With Default Values

page 20

Building With NonDefault Values

page 21

Modifying a WorkShop Target

page 22

Fixing Build Errors

page 22


Building a WorkShop Target

A WorkShop target differs from a make target. When you build a program in WorkShop, you are actually building a WorkShop target. A WorkShop target is an object made up of the following items:

A make target is an object that is built from the rules contained in a particular makefile.


Building With Default Values

The quickest way to build a program is to use the default values provided in the Define New Target dialog box. All you need to supply is the build path.

1. From the WorkShop console, choose Build New Target to open the Define New Target dialog box.

The Define New Target dialog box contains the value Default in the Makefile and Target text fields. If you do not specify a particular makefile or make target, WorkShop looks for a makefile in the build directory named makefile or Makefile and uses the first make target in that makefile. The build command provided by default is dmake. It is set to run in serial mode so you can run one job at a time on the local host. For information on building in distributed mode, see "Running a Distributed Build" in the online help or WorkShop: Beyond the Basics.

2. Type the build path in the Directory text field.

You can also click the button to the right of the text field to open a directory chooser. Choose a directory in the list and click OK to load it into the Directory text field.

3. Click Build at the bottom of the dialog box and watch the build output in the Build Output display pane in the Building window.

The Building window opens when you click the Build button.

The build output is displayed in the Build Output display. Click on the Stop Build button in the Building window to stop the build process.


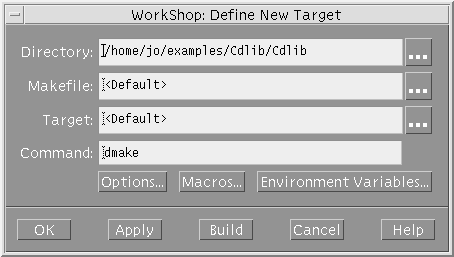
Note - The next time you bring up the Building window, the build directory will be set to the last directory in which you ran a build job. You can see the path name in the Build Information field.


Building With NonDefault Values

If you have a specific build command, a makefile with a unique name, or a certain make target, specify it in the Define New Target dialog box.

1. Type the name of the directory you want to build in and click Apply to apply the change.

You can also select another directory from the Set Build Directory dialog box by clicking the button next to the Directory text field.

2. Type the name of the makefile you want in the Makefile text field.

If you want to choose another makefile from the current build directory, click on the button next to the Makefile text field. Choose a makefile from the list in the Set Makefile dialog box and click OK to load it into the Makefile text field.

3. Type the name of the make target you want in the Target text field.

You can also choose another make target in the current makefile by clicking on the button next to the Target text field. Click OK in the Target Chooser dialog box to load the make target into the text field.

4. Type the name of the build command you want in the Command text field.

If the build command you specify is something other than make or dmake, you can include any of its arguments in the Command text field.


Note - If the build command is not in your PATH, you might have to specify the full command path.

5. Click Build in the dialog box to start a build with the settings you supplied.


Modifying a WorkShop Target

To edit an existing WorkShop target, choose Build Edit Target and choose a WorkShop target from the list. The Edit Target dialog box opens, displaying the current settings for the build directory, makefile, make target, and build command. Edit any of these fields or change options, macros, or environment variables. Click Build to rebuild the WorkShop target with your new settings. See "Editing a WorkShop Target" in the online help for detailed information.


Fixing Build Errors

The process of fixing build errors has improved due to the integration of the text editor with the build process. When a build fails, the build errors are displayed in the Build Output display of the Building window. Build errors that have links to the source files containing the errors are highlighted and underscored.

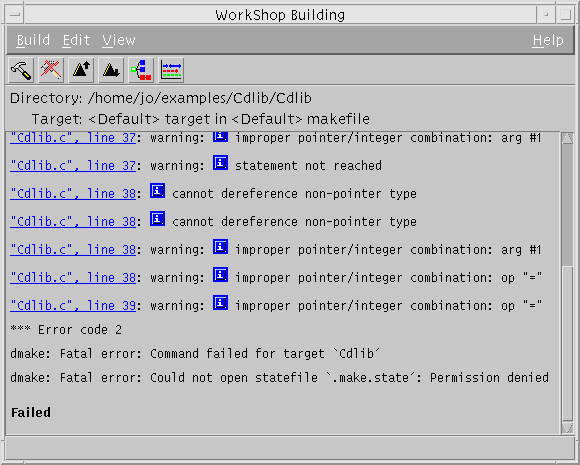
Each error gives the name of the file containing the error, the line number on which the error occurs, and the error message.

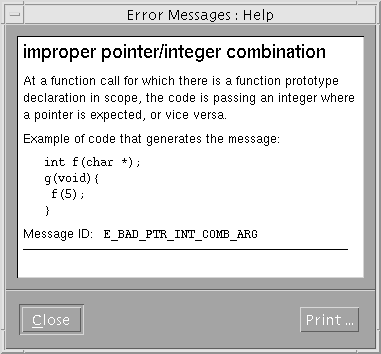
In C programs, an additional glyph (the letter "i") is included in the build error message. Clicking on the glyph opens a pop-up window that defines the associated error message.)


Note - Only Sun compilers produce output that can be converted to hypertext links. If the build command you use does not call Sun compilers, you might lose the link facilities of the Building window.
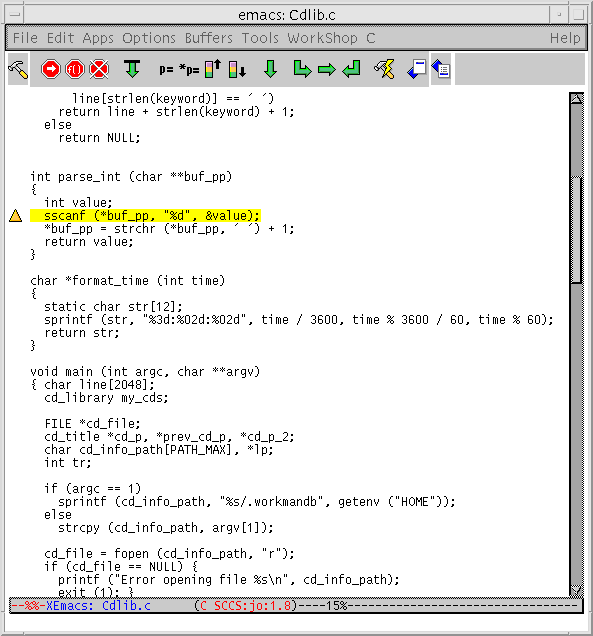
Clicking on the underscored error immediately starts a text editor that displays the source file containing the error. The source file is shown with the error line highlighted and an error glyph appears to the left of the line.

The following steps show how you can use the Building window and the text editor to quickly fix build errors:

1. Click on a highlighted error in the Build Output display.

The editor window opens, displaying the source file containing the error. You do not have to search for the line containing the error--the error line is highlighted in the editor and the cursor is already positioned at the line. The error message is repeated in the footer of the text editor.

2. In the text editor, make sure the source file can be edited.

From the vi editor, choose Version Checkout. From the XEmacs editor, choose Tools VC Check out File file. From the GNU Emacs editor, choose Tools Version Control Check Out.

3. Edit the source file containing the error.

4. In the Building window, click on the Next Error button in the tool bar to go to the location of the next build error in the text editor.

As you click Next Error, notice how each successive error in the build output is highlighted and how the corresponding source line in the text editor is also highlighted.

5. Save your edits to the file.

6. Check the file back in.

7. Click the Build button in the text editor's tool bar to rebuild.

You can also build by clicking the Build button in the Building window's tool bar.

You can watch the Build Output display pane to follow the progress of the build.

For detailed information on building in WorkShop, see the online help. You can access the online help by choosing Help Building from the Building window or by choosing Help Help Contents Building a Program from the main WorkShop window.


Previous Next Contents Index Doc Set Home