Previous Next Contents Index Doc Set Home


Merging Source Files

7


Merging lets you compare two text files, merge two files into a single new file, and compare two edited versions of a file against the original to create a new file which contains all new edits.

This chapter explains how to start Merging, load it with files, and save the output file. The chapter is organized into the following sections:

Understanding Merging

page 55

Starting Merging

page 56

Working with Differences

page 57

Merging Automatically

page 59

Saving the Output File

page 60


Understanding Merging

Merging loads and displays two text files for side-by-side comparison, each in a read-only text pane. Any differences between the two files are marked, and a merged version of the two files which you can edit to produce a final merged version.

When you load the two files to be merged, you can also specify a third file from which the two files were created for comparison. When you have specified this ancestor file, Merging marks lines in the descendants that are different from the ancestor and produces a merged file based on all three files.

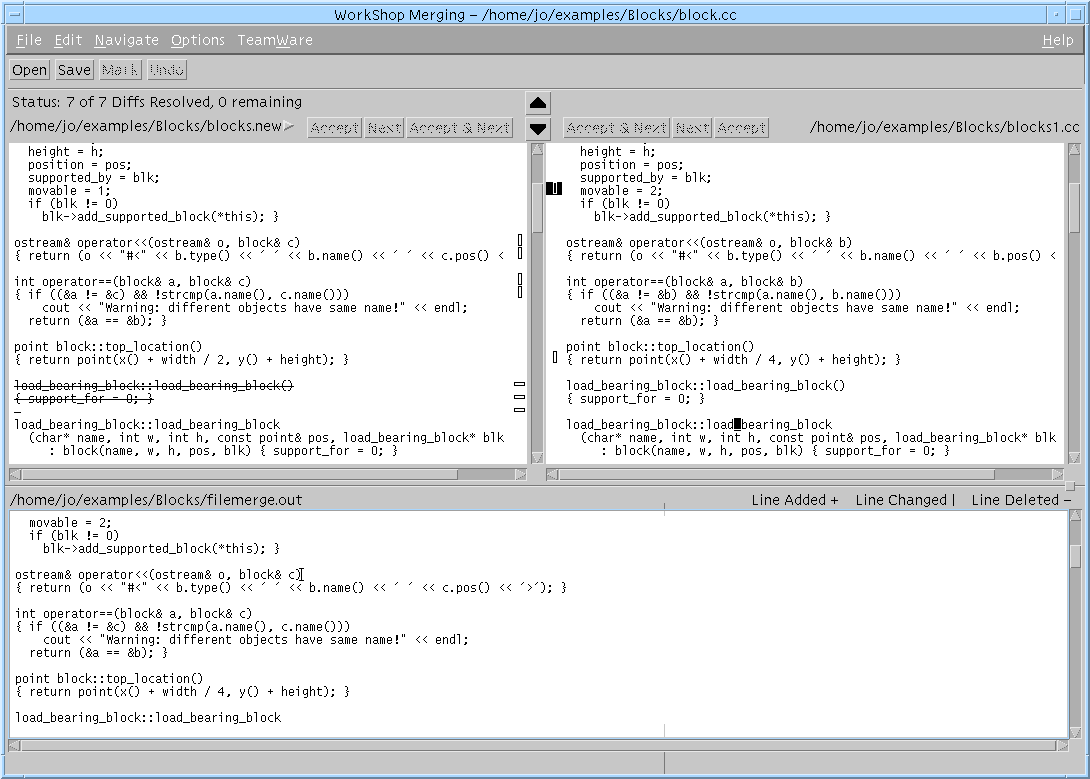
Figure  7-1 Merging Window with Loaded Files
The merged version contains two types of lines:


Starting Merging

Use one of the following methods to start Merging from the WorkShop main window:

   Click the Merging icon
   Choose Tools Merging

Loading Files

To load files into Merging:

1. Choose File Open.

2. In the Directory field, select a working directory.

This is the default directory used to select and save files.

3. In the Left File and Right File fields, select the two files you want to compare.

4. If you are comparing the files against a common ancestor, enter the earlier version of the two files in the Ancestor File field.

An ancestor file is required to use Auto Merge.

5. If you want to specify the name of the output file, enter it in the Output File field.

The name filemerge.out is the default, and is stored in the working directory.

6. Click Open to load the files.

Figure 7-1 illustrates a loaded Merging window. The names of the left file, right file, and output file are displayed above each text pane. In a three-way comparison, the name of the ancestor file is displayed in the window header.


Working with Differences

Merging operates on differences between files. When Merging discovers a line that differs between the two files to be merged (or between either of the two files and an ancestor), it marks the lines in the two files with glyphs corresponding to how the lines differ. Together, these marked lines are called a difference. As you move through the files from one difference to the next, the lines that differ and their glyphs are highlighted.

Current, Next, and Previous Difference

The highlighted difference is called the current difference. The differences immediately before and immediately after are called the previous difference and the next difference.

Resolved and Remaining Difference

A difference is resolved if the changes to a line are accepted. A remaining difference is one that has not yet been resolved.

If the Auto Merge feature is on, Merging resolves differences automatically.

Understanding Glyphs

Glyphs help you understand the differences between files. There are three types of glyph:

Table  7-1 Filemerge Glyphs

Glyph type
Designates

Plus sign

New line

Minus sign

Deleted line

Vertical bar

Change in line

No glyph

No changes in line

Three Input Files

When an common ancestor file is designates, glyphs next to the lines in each file indicate when they differ from the corresponding lines in the ancestor:

When differences are resolved, the glyphs change to an outline font.

Moving Between Differences

You can move between differences using the buttons above the two panes, or the Navigate menu. Use the Previous and Next buttons to scroll through the differences without accepting them.

Resolving Differences

To resolve a difference, you accept the change in either the left or right pane.

To accept a difference:

   Click the Accept button, or Click the Accept & Next button to accept the difference and move to the next difference.


Merging Automatically

Merging can resolve differences automatically, based on the following rules:

When Merging automatically resolves a difference, it changes the glyphs to outline font. Merging lets you examine automatically resolved differences to be sure that it has made the correct choices.

You can disable Auto Merge by choosing Options Auto Merge. When automatic merging is disabled, the output file contains only the lines that are identical in all three files and relies on you to resolve the differences.

If you do not specify an ancestor file, Merging has no reference with which to compare a difference between the two input files. Consequently, Merging cannot determine which line in a difference is likely to represent the desired change. The result of an auto merge with no ancestor is the same as disabling automatic merging: Merging constructs a merged file using only lines that are identical in both input files and relies on you to resolve differences.


Saving the Output File

Save the output file by clicking on the Save button or choosing File Save. The name of the output file is the name you specify in the Output File field.

To change the name of the output file while saving, choose Save As and fill in the new file and directory names in the resulting pop-up window, as shown in the following figure.


Previous Next Contents Index Doc Set Home