


Administering the Workspace |
10 |
 |
Starting a Project with the Configuring Program
Getting started with the Configuring program is simple. The following sections provide guidelines and strategic issues that you (the project administrator) should consider to maximize the benefit your project receives by using the Configuring program. Moving an Existing Project
The Configuring program works only with projects that use SCCS for version control. Moving an existing SCCS-based project to the Configuring program is a simple process:
If your project requires files to be grouped for transfer operations in special ways, you have to write your own FLP(s).
Starting a New Project
If you are starting a new project:
A workspace hierarchy is a chain of parent/child workspaces two or more layers deep. The number of layers in a hierarchy bears no relation to the number of workspaces comprising it. A parent workspace and its child comprise two layers. A parent workspace and three children also comprise two layers. A parent workspace and its child and grandchild comprise three layers. Figure 10-1 depicts a "flat" (three-tiered) hierarchy and a "multitiered" (four-tiered) hierarchy.
Note - Whatever initial decisions you make regarding workspace hierarchies can later be changed by using Configuring's workspace reparenting feature. See "Reparenting a Workspace" on page 66 for details.
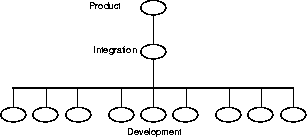
Figure 10-1 A Three-Tiered Hierarchy (Flat)
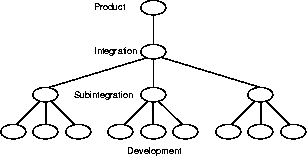
Figure 10-2 A "Multitiered" (Four-Tiered) Hierarchy
File Transfer Considerations
The way in which you set up your workspace hierarchy can have an impact on the transfer of files up and down the hierarchy. If you have over 2000 files in a single directory under SCCS control, you could have problems using TeamWare. Subdivide workspace directories for better performance. File System Accessibility
In order to transfer (Bringover/Putback) files between workspaces, both the parent and the child must be mounted on the same file system. The automounter can be used to connect file systems. Flat Hierarchy vs. Multitiered Hierarchy
Advantages of a Flat Hierarchy
A flat workspace hierarchy is one in which many developers put back files to a single integration workspace. The advantage of a flat hierarchy is that all developers have immediate access to one another's work. The moment that Jack (a developer) puts back his work to the integration workspace, Jon (another developer) can use the Bringover Update transaction to have immediate access to the changes made by Jack. Disadvantages of a Flat Hierarchy
The disadvantage of a flat hierarchy is that time is often wasted because the integration workspace changes frequently, requiring developers to do frequent Bringover transactions, builds, and tests in order to keep their source base up-to-date. There is a cumulative effect of doing Putback transactions; the first developer to do a Putback resolves only one set of changes, the next developer resolves two, and so on till the last developer, who must resolve all of the changes that have been made within her development group. Advantages of a Multitiered Hierarchy
The amount of time required for a developer to put her work back to the integration workspace can be sharply reduced by interposing a tier of subintegration workspaces between the integration and development level workspaces. Disadvantages of a Multitiered Hierarchy
The disadvantages of multiplying subintegration workspaces are as follows:
It's best to dedicate a workspace as a product release staging area for each release. It's also a good idea to "hang" the release workspace off of a top level "product" workspace. The product workspace should be located hierarchically above the workspaces in which normal development integration is done. Locating the product workspace this way permits you to begin development of your next release without corrupting the current release.
After the files are transferred to the product workspace, use the Bringover transaction to transfer the files down to the release workspace. The release workspace can be used to make masters and can serve as an area in which to save work for subsequent releases if necessary. Figure 10-3 shows a hierarchy that contains a product workspace and release workspaces for six different releases. You can use the reparenting feature to transfer data between release workspaces directly. See "A Reparenting Example" on page 68" for details.
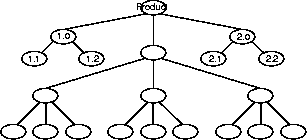
Figure 10-3 Product and Release Workspaces