


Structured Code Generation and Reusable Definitions |
8 |
 |
The structured code controls let you:
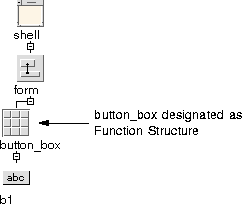
To do this, select the "Code generation" page of the Core resource panel and select "Function" from the "Structure" option menu.
Widget shell = (Widget) NULL;
Widget form = (Widget) NULL;
Widget button_box = (Widget) NULL;
Widget b1 = (Widget) NULL;
/* This is the creation function for the button_box. */Widget create_button_box (Widget parent)
{
Widget children[1]; /* Children to manage */
Arg al[64]; /* Arg List */
register int ac = 0; /* Arg Count */
Widget button_box = (Widget)NULL;
	button_box = XmCreateRowColumn ( parent, "button_box", al, ac
);
b1 = XmCreatePushButton ( button_box, "b1", al, ac );
children[ac++] = b1;
XtManageChildren(children, ac);
/* The button box is created, but not managed, and returned. */ return button_box;
}
/* The creation function for the Shell calls the button box creation function. */void create_shell (Widget parent)
{
Widget children[1]; /* Children to manage */
Arg al[64]; /* Arg List */
register int ac = 0; /* Arg Count */
XtSetArg(al[ac], XmNallowShellResize, TRUE); ac++;
shell = XmCreateDialogShell ( parent, "shell", al, ac );
ac = 0;
XtSetArg(al[ac], XmNautoUnmanage, FALSE); ac++;
form = XmCreateForm ( shell, "form", al, ac );
ac = 0;
button_box = create_button_box ( form );
/* The constraint resources for the button box are set in the parent's creation function. */ XtSetArg(al[ac], XmNtopAttachment, XmATTACH_FORM); ac++;
XtSetArg(al[ac], XmNleftAttachment, XmATTACH_FORM); ac++;
XtSetValues ( button_box,al, ac );
/* The button box is managed at this point. */ children[ac++] = button_box;
XtManageChildren(children, ac);
}
This module now has two functions: one (create_shell()) for creating the whole hierarchy and one (create_button_box()) for creating the button box.
8.4 Data Structures
The next type of code structuring is the data structure. This is similar to a function structure, in that WorkShop Visual generates a separate creation procedure for the widget and its descendants. When a widget is designated as a data structure, WorkShop Visual also generates a typedef for a structure including that widget and its children. The creation procedure for the widget creates and sets up that type of structure and returns a pointer to it. A deletion function (delete_<widget_name>) is also generated so that the allocated memory can be freed.
/* First the type declarations are generated for the data structure. */
typedef struct button_box_s {
Widget button_box;
Widget b1;
} button_box_t, *button_box_p;
Widget shell = (Widget) NULL;
Widget form = (Widget) NULL;
button_box_p button_box = (button_box_p) NULL;
/* The creation procedure returns a pointer to a button_box structure. */button_box_p create_button_box (Widget parent)
{
Widget children[1]; /* Children to manage */
button_box_p button_box = (button_box_p)NULL;
/* Space is allocated for the structure and the fields are filled in. */ button_box = (button_box_p) XtMalloc ( sizeof ( button_box_t )
);
	button_box->button_box = XmCreateRowColumn ( parent,
"button_box", al, ac );
	button_box->b1 = XmCreatePushButton

( button_box->button_box, "b1", al, ac );
children[ac++] = button_box->b1;
XtManageChildren(children, ac);
return button_box;
}
/* A deletion function is supplied to free the allocated memory. */void delete_button_box ( button_box_p button_box )
{
if ( ! button_box )
return;
XtFree ( ( char * )button_box );
}
/* Again, the Shell creation function calls the button box creation function. */void create_shell (Widget parent)
{
Widget children[1]; /* Children to manage */
Arg al[64]; /* Arg List */
register int ac = 0; /* Arg Count */
shell = XmCreateDialogShell ( parent, "shell", al, ac );
form = XmCreateForm ( shell, "form", al, ac );
button_box = create_button_box ( form );
XtSetArg(al[ac], XmNtopAttachment, XmATTACH_FORM); ac++;
XtSetArg(al[ac], XmNleftAttachment, XmATTACH_FORM); ac++;
/* The button_box widget has to be referenced inside the structure. */ XtSetValues ( button_box->button_box,al, ac );
ac = 0;
children[ac++] = button_box->button_box;
XtManageChildren(children, ac);
ac = 0;
}
8.5 C++ Classes
The use of C++ classes is very similar to data structures. WorkShop Visual does not wrap each widget in the hierarchy with a C++ class, but instead designates sections of the hierarchy as classes in their own right. Each widget designated as a C++ class has a class defined for it. Its named descendant widgets become members of that class and widget creation and widget destruction methods are supplied. In addition, if the class contains members that are themselves (pointers to) classes, a constructor and destructor method is generated to create and destroy these members. Note that the widgets are not created at the time of the class instance but by an explicit call to the widget creation function. Similarly, destroying the class instance does not destroy the widgets.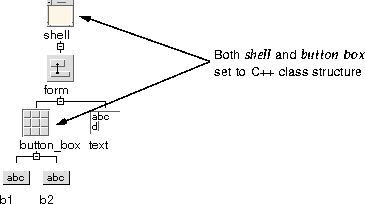
Figure 8-2 Example: C++ Class Structures
// Classes are declared for button_box and shell.
class button_box_c: public xd_XmRowColumn_c {
public:
virtual void create (Widget parent, char *widget_name = NULL);
protected:
Widget button_box;
Widget b1;
Widget b2;
};
typedef button_box_c *button_box_p;
// The shell class has constructor and destructor functions because it
// contains a pointer to class (or data structure) member.class shell_c: public xd_XmDialog_c {
public:
virtual void create (Widget parent, char *widget_name = NULL);
shell_c();
virtual ~shell_c();
protected:
Widget shell;
Widget form;
Widget text;
button_box_p button_box;
};
typedef shell_c *shell_p;
shell_p shell = (shell_p) NULL;
// The creation function now becomes a method of the class. This method
// is declared public in the WorkShop Visual base class, which is supplied
// with the release.void button_box_c::create (Widget parent, char *widget_name)
{
Widget children[2]; /* Children to manage */
Arg al[64]; /* Arg List */
register int ac = 0; /* Arg Count */
if ( !widget_name )
widget_name = "button_box";
button_box = XmCreateRowColumn ( parent, widget_name, al, ac );
// _xd_rootwidget is a protected member of the class that stores the widget
// that is at the root of the sub-hierarchy. This lets the base class
// operate on the widget. _xd_rootwidget = button_box;
b1 = XmCreatePushButton ( button_box, "b1", al, ac );
b2 = XmCreatePushButton ( button_box, "b2", al, ac );
children[ac++] = b1;
children[ac++] = b2;
XtManageChildren(children, ac);
ac = 0;
}
// The Shell's creation method calls that for the button box.void shell_c::create (Widget parent, char *widget_name)
{
Widget children[2]; /* Children to manage */
Arg al[64]; /* Arg List */
register int ac = 0; /* Arg Count */
if ( !widget_name )
widget_name = "shell";
XtSetArg(al[ac], XmNallowShellResize, TRUE); ac++;
shell = XmCreateDialogShell ( parent, widget_name, al, ac );
ac = 0;
_xd_rootwidget = shell;
XtSetArg(al[ac], XmNautoUnmanage, FALSE); ac++;
form = XmCreateForm ( shell, "form", al, ac );
ac = 0;
text = XmCreateText ( form, "text", al, ac );
// The button box class is instantiated in the constructor method and so at // this point only the widgets need to be created. button_box->create ( form, "button_box" );
XtSetArg(al[ac], XmNtopAttachment, XmATTACH_WIDGET); ac++;
	XtSetArg(al[ac], XmNtopWidget, button_box->xd_rootwidget());
ac++;
XtSetArg(al[ac], XmNleftAttachment, XmATTACH_FORM); ac++;
XtSetValues ( text,al, ac );
ac = 0;
XtSetArg(al[ac], XmNtopAttachment, XmATTACH_FORM); ac++;
XtSetArg(al[ac], XmNleftAttachment, XmATTACH_FORM); ac++;
XtSetValues ( button_box->xd_rootwidget(),al, ac );
ac = 0;
children[ac++] = text;
children[ac++] = button_box->xd_rootwidget();
XtManageChildren(children, ac);
ac = 0;
}
shell_c::shell_c()
{
// Instantiate the child classes. button_box = new button_box_c;
}
shell_c::~shell_c()
{
// Free the child classes. delete button_box;
}
If a widget is designated a C++ class and C code is generated, the widget is treated as if it were a data structure. 8.5.1 Callback Methods
The X toolkit functions which invoke callback functions expect a callback function in the following form:void my_callback (Widget, XtPointer, XtPointer)
An ordinary member function is not suitable as a callback function because the C++ compiler passes it an extra first parameter - the this pointer - that lets it find the instance data for the object. If you use an ordinary member function as a callback function, the member function interprets the widget pointer as the instance data pointer and does not work as expected.static void my_callback (Widget, XtPointer client_data,
XtPointer call_data)
The client data parameter is used to pass in a pointer to the instance. The static member function merely calls an ordinary non-static member function using that instance pointer and passes on the widget and call data parameters. The non-static member function has the following form:virtual void my_callback (Widget, XtPointer call_data)
WorkShop Visual generates both function declarations, all the code for the static callback function and a stub for the regular member function which is written by you. Note, because this function is declared as virtual, you can override it in a derived class to modify the behavior. For a discussion of this technique, see "Object-Oriented Programming with C++ and OSF/Motif" by Douglas Young. 8.5.2 Editing Callback Methods
When you add a callback method, WorkShop Visual also adds a declaration for the method (if it has not already been declared). Pressing the "Methods" button in the Callbacks dialog shows you a list of the methods declared in the enclosing class of the currently selected widget.
8.6 Method Declarations
If you add a callback to a method, for convenience WorkShop Visual adds the declaration of the method in the enclosing class for that widget. You can view, add and remove method declarations by selecting the widget which is the enclosing class and selecting "Method declarations" from the "Widget" menu. The Method Declarations dialog is shown in Figure 8-3.
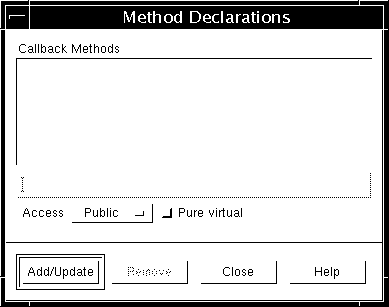
Figure 8-3 Method Declarations Dialog
8.6.1 Method Access Control
By default, methods added by WorkShop Visual have public access. You can control the access for individual callback methods using the "Access" option menu in the Method Declarations dialog. 8.6.2 Pure Virtual Methods
You can set the "Pure virtual" toggle to declare the non-static member function as pure virtual. For example, if you set this toggle for a callback method OnNew() in a menubar class, WorkShop Visual would declare the method as:class menubar_c: public xd_XmMenuBar_c {
...
public:
...
virtual void OnNew( Widget, XtPointer ) = 0;
};
Because the function is pure virtual, you do not have to provide an implementation of menubar_c::OnNew() and menubar_c becomes an abstract class. That is, you cannot create an instance of menubar_c but only use it as a base class for others. 8.6.3 Deleting Callback Methods
When you remove a callback method from a widget you are only removing the use of the method (the call to it). When you add a method callback in WorkShop Visual, a declaration of the method is automatically added for you. If you want to remove this declaration as well you must remove it from the method declarations list of the widget which is the enclosing class. See the Method Declarations section on page 274 for more information on how to do this and for information on the declaration added by WorkShop Visual.
8.6.4 Method Preludes
You can add additional data or function members to a C++ class using the "Code preludes" dialog. Select "Public methods", "Protected methods", or "Private methods" and type your declarations into the text area (or into the code if you are editing in place). C++ code preludes are generated into the class declaration, both in the primary module and in the Externs file. 8.6.5 Creating a Derived Class
To add a function to a class it is often better to write a new class derived from the generated class. The logical gap between the subclass and generated base class can be used to add members and provide implementations for virtual functions.class menubar_c: public xd_XmMenuBar_c {
...
};
When WorkShop Visual generates code to create an instance of the class, it uses the same name:menubar = new menubar_c;
You can change the default behavior so that WorkShop Visual declares the generated class under one name and creates the instance under another. For example:menubar = new mymenubar_c;
To make this change, use the "Instantiate as" field on the Code Generation page of the Core resource panel. 8.6.6 Modifying the Base Classes
By default, WorkShop Visual derives a generated class from a base class appropriate to the type of the root widget. For example, a class with a MenuBar at the root of its widget hierarchy is derived from xd_XmMenuBar_c. The name of the base class can be changed in the Core resource panel.class xd_base_c
{
public:
xd_base_c() {_xd_rootwidget=NULL;}
Widget xd_rootwidget() const {return _xd_rootwidget;}
protected:
Widget _xd_rootwidget;
private:
void operator=(xd_base_c&); // No assignment
xd_base_c(xd_base_c&); // No default copy
};
WorkShop Visual places no other constraints on the base classes used. In other words, any set of base classes can be used provided that they are derived from xd_base_c (or another base class that satisfies WorkShop Visual's assumptions). class menubar_c : public mymenubar_c {
public:
menubar_c();
...
};
...
menubar_c::menubar_c ()
:mymenubar ( "Hello World" )
{
}
...
menubar = new menubar_c;
8.7 Children Only Place Holders
The Children Only structure option lets you designate one widget (the Children Only widget) as a container structure for another structure. Children Only widgets provide context for their descendants in the hierarchy, but no code is generated for them. Consider the following example: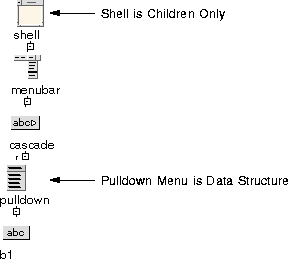
Figure 8-4 Use of Children Only Structure
Note - If you specify a widget as "children only", code is only generated for children which are structured or named. Therefore, if all you have underneath a "children only" widget is unstructured and unnamed widgets, then all you will see in the code is Widget declarations.
8.8 Structured Code Generation and UIL
When generating UIL for a design that contains structures of some kind, the approach is basically similar for that of C and C++. Independent hierarchies are generated into the UIL file and separate creation functions are generated into the code file. The creation function fetches the appropriate widgets from the UIL hierarchy and fills in the data structure fields as appropriate.
8.9 Changing Declaration Scope
Widgets are normally declared locally in the enclosing creation function unless they are structured in some way, or named. In this case they are declared in the enclosing structure if there is one, or as global variables. This default behavior can be modified by setting the storage class of a widget in the Core resource panel. Setting the storage class to Local forces a widget that would otherwise be declared globally or within a structure to be local to the creation function. Setting the storage class to Global forces an unnamed widget or a named element of a structure to be global. Global status is especially useful for widget-type resources and links as discussed in the Unreachable Widgets subsection below. The Static option is similar to Global but the declaration is static to the module. 8.9.1 Unreachable Widgets
When you use the structured code generation in conjunction with widget-type resources such as XmNdefaultButton for a BulletinBoard, you could specify designs that reference widgets that are not in scope. These are considered unreachable widgets. WorkShop Visual attempts to detect these cases and warns you at code generation time. Also, if you use unreachable widgets in conjunction with Children Only structures or dynamic run time creation of hierarchies, unexpected failures may result.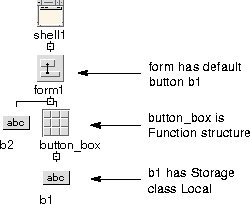
Figure 8-5 Hierarchy with Unreachable Widgets
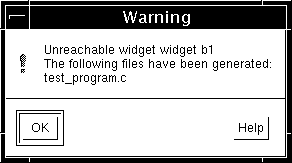
Figure 8-6 Unreachable Widget Error
8.10 Definitions
Once a hierarchy of widgets has been encapsulated as a structure (either a C++ class or a C structure), you can re-use it in other designs by turning it into a definition. A definition is a reusable hierarchy of widgets which is added to the WorkShop Visual widget palette. Selecting a definition from the palette creates an instance of the definition in the design. This instance can be further modified and in turn be made into a definition. 8.10.1 Prerequisites
A widget hierarchy can become a definition provided that:
To make the definition available for use in other designs WorkShop Visual needs an external reference to it. This is provided by means of a definitions file which is edited using the Edit Definitions dialog.
8.10.3 Definition Shortcut
The "Define" button in the Palette Menu is a quick way of adding a new definition. It designates the currently selected widget as a definition, saves the design and adds the definition to the palette. The header filename for the definition is taken from the type declarations filename in the code generation dialog. No icon is used.
8.11 The Definitions file
The definitions file is read by WorkShop Visual to establish the set of definitions which are to appear on the palette. The definitions filename is specified by setting the definitionsFileName resource. The default value is $HOME/.xddefinitionsrc.visu.definitionsFileName:/home/project6/xddefs
The value of this resource can include environment variables:visu.definitionsFileName:$PROJECT_ROOT/xddefs
To change to the new setting, exit and restart WorkShop Visual. 8.11.1 Editing the Definitions File
To modify the definitions file use the Edit Definitions button in the Palette menu.
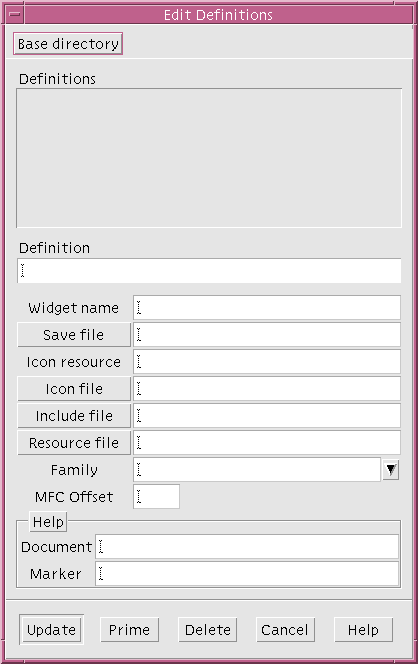
Figure 8-7 Adding a Definition to the Palette.
You can use the "Prime" button to fill in several of the fields for the currently selected widget.
To specify a base directory, display the Edit Definitions dialog, click on "Base Directory", select a new directory and click on "Apply". The new base directory is saved in your definitions file and is immediately used in the current session of WorkShop Visual. The base directory cannot be changed if the current design contains instances of existing definitions.
If any changes cannot be reconciled, WorkShop Visual displays an error message and saves any irreconcilable parts of the design in temporary WorkShop Visual clipboard files. At this stage there are several ways to proceed:
Note - Definitions and instances must be in separate designs. Although you can see them in the same design within WorkShop Visual, the generated code needs to be kept separate so that the code generated for the instance can include the header file generated for the definition.
8.13.2 Modifying and Extending an Instance
Creating an instance of a definition corresponds to creating an instance of the structure (either a C structure or a C++ class). You can modify an instance after you have created it provided that the modifications can be reflected in the generated code. For example, you can set resources on widgets or add children to widgets only if they are accessible (i.e. if they are named and, for C++, they have an appropriate access mode). You cannot remove widgets or change their names. The root widget is an exception. Because the root widget of the instance is always accessible (through the member function xd_rootwidget()), it can always be modified.
Note - You cannot move a widget in the layout editor, or specify constraints for it, unless it is accessible.
8.13.3 Creating a Derived Structure
It is frequently useful to create a new structure that is derived from the definition. To do this simply set the Structure option on the Code generation page of the Core resources dialog. The derived structure can only be set to the same value as the definition, e.g. it is not possible to derive a C++ class from a C structure. 8.13.4 Overriding a Definition Callback Method
Inherited methods from definitions can be overridden in the instance so that the instance has different behavior from that specified in the definition.
8.14 Definitions and Resource Files
Resource values for widgets that are components of definitions can be either hard-coded or specified in resource files. 8.14.1 Instances and Definition Resource Files
When you specify a resource file for a definition, WorkShop Visual #includes that file in the resource file for any design that contains an instance of the definition. The Xlib mechanisms that read the resource file interpret this directive and use it to find the resource file for the definition.
8.15 Online Help for Definitions
To record information about a definition and communicate with other developers who are using it, you can provide online help for definitions. The online help is accessed in the WorkShop Visual interface by using the <Tab> and arrow keys to get to the icon or button for the definition, then pressing the <osfHelp> key (usually <F1>). $VISUROOT/lib/locale/{$LANG}/help
where VISUROOT is the path to the WorkShop Visual installation root directory and LANG is the name of your locale (default C). 8.15.1 Text Help Documents
Text help documents are in HTML format. The name of the file is formed by concatenating the document name and marker name. These are joined using the value of the visu.userHelpCatString resource. By default this resource is set to ".". WorkShop Visual looks for this file in the UserDocs subdirectory of the WorkShop Visual help directory.
2 The comments describing the functions and procedures are not generated.
3 The comments describing the functions and procedures are not generated.